March Kit Layouts for Citrus Twist

Monday, March 17, 2014

I'm settling into a new blogging non-routine over here nicely, and while I don't intend to make it the norm to go for long stretches between posts, I've been putting the extra time to good use in my craft room! I've got paint drying on a layout as I type, and I'm about to go all kung-fu with a craft knife once this is posted and start in on an altered book for the April Citrus Twist gallery.

Speaking of Citrus Twist, I still have my March kit layouts to share! The new kits went live in the shop last week, and in the spirit of being a kinder, gentler blogging task-master to myself, I'm going back to sharing all of the layouts in one post again. :)

I didn't realize until after I'd finished my first layout (using just the main kit) just how many photos I have of my niece, Sophie, reading with someone in our family! There's this page I scrapped of her and Darren, one from January of her getting in a little story time with her Poppy, and in today's layout she's reading gardening magazine with my Mom- her Noni. I'm pretty sure that there's a photo of me reading a My Little Pony book to her floating around my Lightroom library, too, so I may have to scrap that one soon to add to the collection. And, total aside, but My Little Pony has changed a lot since I played with them as a kid!

DSC_0244-2.jpg

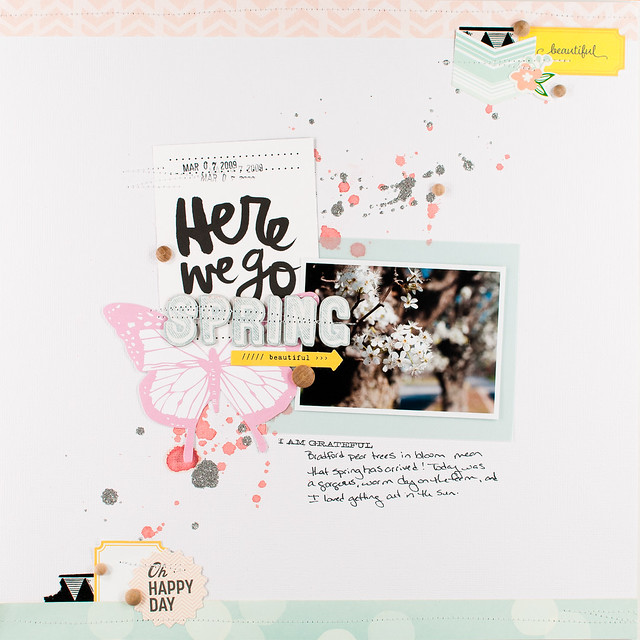
My next layout was for one of the sketch challenges over at Citrus Twist, and I got all inky and glitter splatter-y with this one! Glitter splatters are really easy to make- just water down some plain white glue, load it up on a paintbrush, and splatter it across the page just like mist, except you cover it in glitter afterward.

DSC_0247-2.jpg

I filmed a music-only (no voiceover) video of this layout since it's actually pretty easy for me to flip on the video camera that always stands over my work table. It still takes a bit of time to edit, but it really is so much faster than doing voiceovers, so hopefully you enjoy it! For those who subscribe to my blog via email, you can watch the video here on YouTube.


I must have been wishing for spring while working with these kits. Actually, I still am- it's cold here today! This layout mixes together pretty much all of the kits, and I started with a loose grid-style arrangement for my photos and then did my usual thing filling in the gals between them with papers, stickers, and other embellishments. It's pretty much my favorite way to make a page!

DSC_0250.jpg

My last layout with the April kits is a Project Life page from my 2011 album, which is I think only 6-7 weeks away from being completed now! Since I've stepped back from blogging a bitI now have more time for photo editing, and I'm working on getting the rest of my photos caught up and printed. It helps that I've finally made friends with VSCO keys for Lightroom. There's definitely a learning curve, but I can edit so much more quickly now!

project life 2011 - september 4-10.jpg

And today? It's my birthday! We've done the usual stuff- getting the birthday Starbucks treat and sushi for lunch- along with a few new things like picking up more oxalis (shamrocks) for the gardens and a new batch of succulents for my desk. I'll write up the full account of our adventures over on my personal blog once the day is over and I've processed the photos. I've already printed a few to scrap as I lift one of Wilna Furstenburg's layouts, including the one of some of my new plants below!

DSC_4876.jpg

Two Page Layout Process in Photos - "SWCVII Day One"

Tuesday, February 25, 2014

I decided to throw down a two-page layout while I was working with the February kits from Citrus Twist, using another stack of my photos from Star Wars Celebration VI. It's been a while since I made a two-pager, and I decided to take some photos of my process as I went along!

Before I dive into that, though, here's a peek at the finished product:

swcvii day one.jpg

After choosing photos for this page (meaning I simply pulled a pre-printed stack out of my photo storage binder), I started my design by deciding on a layout background. I loved the way the star-printed paper from Elle's Studio looked next to a piece of white cardstock, and I really do like making two-page layouts where each side has a different background. I realized, though, that it would look very similar to the background of another two-page layout that I made for Two Peas last year, which wasn't a huge deal, except they would both end up relatively close to each other in the same album.

DSC_4541.jpg

I changed things up by using two sheets of white cardstock instead. I cut the gray star paper down to 11.5" x 11.5" inches and placed it so that roughly 2/3 of it overlapped the right side of the layout, with the other third on the left.

DSC_4542.jpg

Placing the photos is the next part of my design process, and it's usually the part that a) takes the longest and b) can sometimes be a source of frustration if I can't get a design to work. I don't pre-plan photos and sizes before printing, and in fact when I originally sent these off to the developer, I'd envisioned them on 4-5 layouts of their own, using just 1-2 photos per page. I was really winging it to use these all together, but that's just how I roll with a two-page layout! The best advice I can give you if you want to similarly fly by the seat of your pants is to make sure to print a variety of sizes, mixing small, medium, and large, and to throw some squares in with all the rectangles. I wish I had done that here, but I worked with what I had.

DSC_4543.jpg

Sometimes with a two-page layout I design on a line, much as I did with that layout that I referenced earlier. Other times I start in the middle of the page and work my way out, balancing things so that one side has a few more photos than the other, both to add some interest and also because the emptier side is usually where the title and journaling ends up, so it's all balanced in the end.

DSC_4544.jpg

The photo above was my first shot at laying things out, and you can see that I've already identified a few embellishments and paper pieces that I want to use. This part of the process is really a lot of back and forth of trying to make some sort of a loose grid with my photos, knowing that I'll fill in any awkward gaps with more patterned paper and embellishments.

DSC_4545.jpg

For my second run at a photo arrangement, shown above (as I'm working I take photos of each arrangement with my phone so that if I decide that I really did like one, I can always go back to it) I went with an approach that was a little more linear, but something still just wasn't gelling for me, so I gave it one last shot.

DSC_4546.jpg

For this third (and ultimately final) arrangement, I split the photos up into three different groups, spaced across the page. I've used a similar type of grouping before, though with a slightly different background, on yet another layout for Two Peas- Merry Halloween. On that page I used the three different groupings to show the three different steps of our pumpkin carving exploits. On my current layout the photos don't have any real reason to be in groups other than I thought that the shapes worked well together, and the photos are all from the same day. You could also use this same grouping technique with more than three groups of photos- it's a really flexible arrangement.

DSC_4547.jpg

With the photos in place, it was time to start adding in more patterned paper and embellishments. In the photo above I've added a sheet of blue paper from the Citrus Twist Pocket Life kit's 6x6 paper pad, along with several small pieces from an October Afternoon cut-apart sheet and some die cuts from an Elle's Studio pack. In the photo below I've added another sheet from that 6x6 pad- this time in red- on the left page and have also added a title and started an embellishment cluster on the top left.

DSC_4548.jpg

Once I have my photos in place, you can see that the final parts of the layout come together really quickly! I queued off of the circle print 3x4 card for my colors and tried to make sure that I included bits of aqua, red, blue, and yellow in all three sections of the layout to help with the balance.

swcvii day one.jpg

Here's a closer look at the left and right page, along with some detail shots.

DSC_0233-2.jpg

DSC_0234-2.jpg

DSC_5997.jpg

DSC_5999.jpg

DSC_6000.jpg

And that's how I go about making a two page layout! I used to find them intimidating, but I've learned in the last year or so of making them on my own (that is, without sketches), that the key for me really is a variety of photo sizes and just finding a photo arrangement that I'm happy with. I think if I tried to actually sit down and plan photo sizes for a layout before printing I wouldn't be nearly as happy as I am with this method, so "winging it" it is going to continue to be my go-to process!

6x6 Layout - Citrus Twist

Tuesday, February 18, 2014

Hola, and a happy Tuesday to you all! We're getting back to something resembling normal here after last week's snowstorms and yesterday's holiday, making this my first full day back at the office in nearly a week! Before I scoot off to work, though, I wanted to share another one of my layouts with the February kits from Citrus Twist.

DSC_0232-2.jpg

Yup, that's my li'l bro in those photos, taken while we were at Star Wars Celebration VI. We're both married to people who could really care less about the whole Star Wars universe, so J flew down to Orlando to join me at the last convention for a few days of geeky sibling bonding. It was an absolute blast, and I'm trying to convince him that, yes, he really can fly to Anaheim next spring to go to Celebration VII! He keeps mentioning something about being busy with a second child that he and Beth spawned last fall, though... :)


DSC_6005.jpg

If this layout looks a little less patterned paper-y than my norm, it's because I put it together for Citrus Twist's weekly blog feature on using 6x6 paper pads on layouts. The Pocket Life kit each month features a different pad (this month it's Kelly Purkey's Mon Ami for Basic Grey), and we like to give lots of inspiration for making traditional pages as well as Project Life to help get those pads used up.

DSC_6003.jpg

One of my favorite things to do with 6x6 pads is to die cut them and use them as accents on my pages. My Sizzix Big Shot can only fit papers that are 6" wide or narrower, making these little pads perfect for running through for quick cuts without having to cut a larger sheet of paper down to fit. Throw in a die set like Lawn Fawn's Puffy Stars that has both large and small elements, and you can easily piece together a layout background using just a sheet of cardstock as a base. I stacked the dies to create the outlines, then used them individually to make perfectly-sized stars to fill those borders.

DSC_6007.jpg

And, with that, I'm off to work to write lots and lots of code. I hope that you all have an awesome day- thanks so much for stopping by!

Project Life 2013 - Week 35 with Citrus Twist Kits

Monday, February 10, 2014

The February kits from Citrus Twist aren't quite what you might expect from a release that happens so close to Valentine's Day, though since they're a mid-month club and don't start shipping until the 15th, maybe it's not so unexpected after all! In any case, instead of the pinks and aquas and proliferation of all things heart-shaped that you're seeing right now, the new kits have a much bolder color palette based on the primary colors in Kelly Purkey's Mon Ami collection for Basic Grey.

Those colors, as it turns out, were perfect for scrapping some late summer photos from a week last August, especially since these photos had tons of yellow in them, including the food at a lunch out with Mom and Dad to Darren's shirt at the Botanical Gardens.

project life 2013 week 35.jpg

Along with those bolder colors, I also included lots of neutral white, gray, and cream in this layout. After watching Noell's latest Paperclipping video along with another by one of my favorite Project Life-ers, Leena Loh, I realized that my spreads sometimes look so crazy busy to me because I use tons of color without much breathing room. The addition of the large neutral areas with just little pops of color really helps this layout not feel crowded, I think, and I'll definitely keep that in mind going forward.

DSC_0228-2.jpg

DSC_0230-2.jpg

DSC_5983.jpg

DSC_5984.jpg

DSC_5985.jpg

I have something like four or five of my 2011 Project Life weeks in-process at the same time on my scrapping table right now, and I love it! At this rate I'll be closing out that album in no time, meaning that 2011 and 2012 will be completely finished! I'm also making good progress on getting the rest of my 2013 photos edited and printed, and I've started on my process for my 2014 6x8 albums. I love being able to dive in at different parts of the process and do the things I feel like doing on a certain day, whether I feel like being lazy and editing at my computer, being geeky and working on a new process, or being crafty and actually making a layout.

New Layout + New Kits at Citrus Twist

Thursday, February 6, 2014

The new February Kits at Citrus Twist went live yesterday, and today's layout was made using just the main kit, Good Life. There are lots of fun goodies in this month's kits including new papers from Kelly Purkey's Mon Ami collection for Basic Grey, chipboard from October Afternoon's Daily Flash line, and of course fun exclusives including flair badges and wood veneers.

DSC_0231-2.jpg

Ahhhh, 8.5x11. When I'm stuck these days, I've found that pulling out this size tends to help at least get things started. I admit that I have not been feeling my most creative lately, and it actually worried me a little until I realized that the exact same thing happened at nearly the exact same time last year. Winter and I do not mix well at all, and this particular one has of course been one of the coldest and harshest in a while. It's been gray, it's been windy, it's been really, really cold, and I am so tired of doing all of my workouts indoors. And now I'm really tired of hearing myself whining, so I'm going to stop. :)

DSC_5993.jpg

After making this layout I took a couple of days off of scrapping, cleaned my craft room, did a little Pinterest browsing, and even indulged in a little Disney planning (it will be my first time there ever- yay!). I think I'm ready to get back to making layouts now with a fresh perspective and a much lighter attitude (I was being way too hard on myself when I started scrapping this page), and I don't think I'll have any trouble finishing my other layouts by the time they're due in the Citrus Twist gallery on the 7th. Sometimes they just don't come as easily as they usually do, but I have to keep reminding myself that this too shall pass.

DSC_5990.jpg

DSC_5989.jpg

Another thing that's looking up right now? Even though it's still quite chilly here, it's the perfect time to plant lettuce seeds so we can once again have fresh salad greens, just like the ones in the photo on this layout. That means spring, my running shoes, and my beloved cherry blossoms are not far behind!

A Few Cards!

Thursday, January 23, 2014

As I was working with the January Kits from Citrus Twist, I had a few pieces set off to the side that I knew I'd likely never use on a layout. I don't scrap Valentine's photos very often, so I took a couple of pieces from one of the cut apart sheets (this particular one was from Crate Paper's Love Notes collection) and made cards with them, instead!

DSC_0217-2.jpg

My approach to making cards these days is simple- treat them like layered embellishment clusters. I put these cards together in much the same way as I embellish my scrapbook pages by tucking in little bits such as tags and labels and using small pieces of paper (mostly scraps from larger layouts) as layers. It doesn't take very long to do, and once the pieces are piled up it only takes a couple of finishing touches like wood veneer or sequins to finish them off.

DSC_0216-2.jpg

The colored cardstock that I used for the card bases is also from the kit, and I cut two A4 (4.25" x 11", folded in half) pieces to make the bases for the two cards above. I had a skinnier little strip left over after doing that, and I decided to put it to use to make a more masculine, decidedly non-Valentine's card using one of the Chic Tags die cuts.

DSC_0215-2.jpg

I'm really loving this method of making cards and am thrilled that it helped me to use up some scraps and other bits. Now if I could just get into the habit of actually mailing them out- that's a whole other subject entirely!! :)

Summer at Bridge Street Layout for Citrus Twist

Tuesday, January 21, 2014

Looking at the photos on today's layout has me seriously wishing for warmer weather! It's cold and windy in Huntsville today, and I'm dreaming of the upcoming summer where it's warm enough to go running at night and dinners on the patio are a must.

DSC_0220-2.jpg

We have a few places we like to eat at on warm evenings, but one of our absolute favorites is Lime Fresh since it's right by the water at Bridge Street...or at least it was until they drained the lake to build a parking deck and a new store- grrrrr! I've actually scrapped another layout, this one filled with neon, about eating there, and I'm glad that I did since the view has changed quite a bit in just the year and a half that's passed since then! That post also reveals some of my inner crazy...you have been warned! 

DSC_5955.jpg

All of the supplies on this layout came from the January Citrus Twist kits after I'd mixed them all up, and was inspired by the pops of orange in the October Afternoon Daily Flash alphabet and a few of the patterned papers. I also stitched part of my title using the orange embroidery thread that came in the kit + a stitching template from one of Amy Tangerine's collections. So excited that she has two more stitching templates coming out in her new line!

DSC_5957.jpg

DSC_5958.jpg

I look forward to being able to once again get out and enjoy the sun in a couple of months, but until then I'm content to stay indoors and scrap about it. :)

R2 Rainbow Layout for Citrus Twist Kits

Thursday, January 16, 2014

After a pair of delayed flights I'm back home from CHA, have more or less caught up on lots of lost sleep, and am getting geared up to start posting lots of photos from the show floor. I also seem to have brought back some unknown allergy/cold/general respiratory issue from the west coast, but I'm not one to let a little germ (or a few thousand) slow me down!

While I sniffle my way through finishing up the massive job that is sorting, editing, and uploading nearly 3,000 photos, I'll leave you with a layout that's from a different sort of convention altogether- this one has photos from Star Wars Celebration VI!

DSC_0218-2.jpg

DSC_0221-2.jpg

There are some photos that I print out even though I'm almost positive that there will never, ever be papers and supplies that work with them. Case in point, this selection of pictures I snapped in the R2 maker space at Celebration. There were droids in every color of the rainbow there, all backed by a crazy green and purple carpet- talk about clashing! When I started working with the Citrus Twist January Kit Add-On, though, and especially those blue glitter Thickers, suddenly scrapbooking these photos became a bit less daunting color-wise.

R2 Rainbow Stitche.jpg

The supplies on this layout are actually a mix of all of the January kits, and I chose shades of pink, aqua, and yellow to mix in with the bold blue letters. Since I had photos of pink and yellow-ish green droids it worked pretty well, and I added the aqua after I layered in the confetti pocket (from the Pocket Life Add-On), since it includes a few aqua dots.

This is also one of those layouts where I scrapped one side as a traditional layout and the other in a pocket page. For now the back side of the pocket page is blank, just like the backs of many of my layouts are blank when I first add them to an album. As I work on adding more pages, I'll take note of any spaces that need to be filled and add either more photos, ephemera, or just some pretty patterned paper. Most of my albums are still very much works in progress, though, so it doesn't bother me at all that they have some unfinished pages in them.

DSC_5960.jpg

DSC_5961.jpg

DSC_5963.jpg

DSC_5954.jpg

I'll be back later with more CHA coverage! You can expect 2-3 booth posts from me per day until I've made it through all of the photos I shot, meaning there's enough detailed CHA coverage to last for a week or two!

"Story Time" Layout for Citrus Twist Kits

Tuesday, January 7, 2014

When the January kits from Citrus Twist arrived I was in the middle of that last little flurry of activity that happens right before Christmas. I had filmed the kit video the day my box arrived, and for the next week or so (when I had almost no time to scrapbook) images of the various pieces went bouncing through my brain. Especially this sheet of paper...

DSC_0871.jpg

...and these die cuts.

DSC_0873.jpg

I knew I wanted to do something with them that involved layering lots of pieces in a row, and even though I was very busy with gift wrapping, tree trimming, and the thousand other little things that happen around the holidays, I still found a few minutes here and there to play with a design.

I started by clustering some of the Chic Tags and Studio Calico bits, not really knowing where I was going with things or even which photos I wanted to use. I just played, knowing that I could easily flip through my binder of printed photos later to pick out something that worked.

DSC_0876.jpg

Over the next few days (I told you I was busy! :) ) I played with adding a few more elements including the butterfly garland and the wood veneer clouds- both kit exclusives. Then, one day after Christmas, I had a little bit more time on my hands and started to actually put my layout together for real.

DSC_0877.jpg

I loved the rainbow scalloped paper from the kit, but with all the other color going on from the die cut pieces I knew it would be overwhelming to use the whole sheet as a background. I'd already been playing with the idea of using a 11.5" square of kraft paper in the center, and, since that seemed to be working well, I stuck with it. I did want to save some of this gorgeous paper to use on other projects, though, so I used a craft knife and a metal ruler to trim a big square right out of the middle, leaving the border intact.

DSC_0878.jpg

You'd never know that square was missing with the kraft paper adhered and stitched in place!

There was one more thing I wanted to try with the die cuts before sticking them all down- arranging them in the same color order as the background paper. I liked the mixed-up look of my first take at piling them on, but I really loved how they looked like this!

DSC_0880.jpg

At this point I still hadn't even started to pick out a photo, so I pulled out my photo binder and started flipping through it with the layout sitting right next to it. It took less than five minutes to choose these pictures of my niece, Sophie Clare, reading with my Dad!

DSC_0881.jpg

With photos in place I could decide on a title, then stick everything down for real and finish off the page.

DSC_0882.jpg

DSC_0210-2.jpg

Everything but the very last stage of this layout- the part where I actually put it together- was done just a few minutes at a time, and I loved the shakeup in my process by starting without any photos in mind!

DSC_5916.jpg

DSC_5917.jpg

DSC_5918.jpg

Keeping plenty of photos printed and ready to go and using tiny bits of time to work on layouts are my two not-so-secret scrapbooking weapons. Together they help me maximize my small amount of creative time and are how I manage to get lots of layouts finished!
CopyRight © | Theme Designed By Hello Manhattan