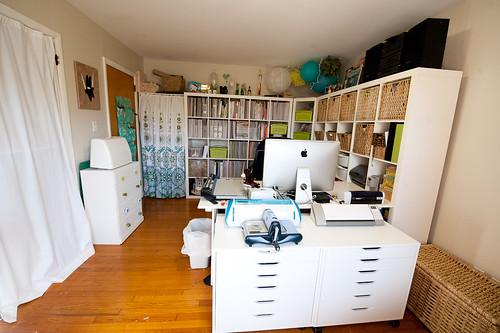
I've finally finished this year's updates and additions to my scrap area, and I've put together a little photo tour to show off all the improvements and to also link up to older posts about storage systems that I still have in place.
This is likely to be a bit of a long post with a lot of back story up front, so I thought I'd start with a photo of the finished product first, just so you won't have to wade through everything I'm about to throw at you without some idea of where we're going to end up.
Ahhhhh, I love it! I'm sitting in it right now as I type this post, and I have to tell you that this is the best arrangement I've ever had in this space!! And, before I dive into too many details, I want to settle a couple of things up front. First, I don't have one of those massive houses. Far from it, actually- our little casa is a mere 1,238 square feet, but since it's just the two of us here I'm blessed to get one of the extra bedrooms to play with (Darren has the other one for his own office), though it does also function as a guest room so I do have to keep that in mind. Second, I didn't acquire everything that you see here in one shot. It's been built slowly over the course of two and a half years and four trips to IKEA, so it's not like I went out and dropped a bundle of money on this setup all at once.
Perhaps I should start with a bit of the history of how I put it all together.
We moved to the house we currently live in in June of 2009. I put off putting together my scrap room for a while because I thought we might have the wood floors refinished first, but we decided it would be best to wait until the bathroom and kitchen remodels were complete so we wouldn't have to worry about dragging cabinets and tubs and new fixtures across freshly sanded and sealed floors. That coupled with an impending knee surgery for me in September kind of sped up the timetable, so in August of 2009 we took our first ever trek to IKEA to pick up a 5x5 Expedit shelf (I'd already had my Madison Trestle Desk from Target delivered straight to my door thanks to a free shipping deal).
Long story short (if you want the long story, you can check out the posts here, here, and here), at the end of that first organization cycle, my room looked like this. Oh, and if you want to see a time-lapse video of how an Expedit is built, you can check out this post from the time I built a pair of them for our bedroom...on New Year's Eve!
Big difference from the current setup, eh? Note the desk against the wall and the plastic drawer units containing color sorted embellishments under the window. Those are going to change shortly.
It took a little more tweaking, but I finally got the room all set up the way I wanted it at the time in January of 2010, and I put together a full walkthrough in five posts- The Desk Area, The Expedit, Mini Album and Kit Storage, Embellishment Storage, and Scraps and Miscellaneous Organization. I'll be referring to some of those posts again later on- some things have stayed the same, and some have changed drastically.
A few months after that tour was posted I set up my copy stand for photographing layouts, adding a table that had formerly been in our old house's entry. At this point with a guest bed, the extra table, and my Expedit and desk in the room, it started to feel a little cramped in it's current configuration. Also, it had a recliner in it that I'd borrowed from my parents since it was the most comfortable thing for me to sleep in for the couple of months after my knee surgeries. Yes, that's plural- one turned unexpectedly into two, but that's a whole other story.
This time my organizational itch didn't wait for winter to flare up. Instead, it took hold in May when I hatched this plan to move everything and try to optimize space. That plan got a bit delayed, though, by overriding demands at work and a pretty heavy schedule of 5K races that I'd signed up to run. Take that, knee surgery!!
It was November before I completed that transition (see, cold weather does it every time!), and by then, just a year ago, my space looked like this.
Thanks to a trip to IKEA with my brother and Beth (who was 8.5 months pregnant at the time- maybe 8.75!!!), I was able to pick up a second 5x5 Expedit unit. I had originally planned to place it on the wall opposite the first one such that they would flank my desk, but as soon as I assembled the second shelf and put it in place, I knew I wasn't going to like that arrangement. Instead, I put the shelves side-by-side and moved the table that used to house my copy stand over to the opposite wall. My desk got moved to right in front of the window so I could enjoy a view of the back yard.
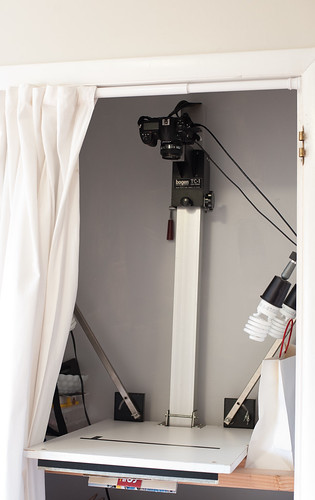
And where did the copy stand go? Into the closet, thanks to a makeshift shelf that Darren built. It's still there today, and it seems to be the perfect spot for it.
It was around this same time that I sorted all my embellishments by color and placed them in bins- you can find that post here- and also reorganized my scrap and paper stack storage (post here). I also reorganized my in-progress project storage somewhere in that same time frame (post here).
Believe it or not, my scrap room actually stayed this way for about a year, but then as soon as it got a little chilly this fall, I got the urge to rearrange it again. I hatched another plan, this time to replace the guest bed with a futon (a comfy one- not a cheap crummy one) so that I could have a couch in my room part of the time and then extend it to a guest bed as necessary (since we only have company a very few times a year). Moving the bed out of the space opened up a new world of layout possibilities for me, and I quickly devised a scheme to turn my two existing 5x5 Expedits into a corner unit.
But first, I had to go back to IKEA.
If you happen to have an IKEA store close to you, then you're very lucky indeed. If you've never been able to go to one and find yourself in a city that has one, you might want to pop in if only to see the wealth of wonderful storage, organization, and furniture arrangement ideas they have on the show floor.
There are tons of "rooms" set up- everything from living rooms to bedrooms to full blown apartments!
And you can even eat there an make a day of it, which is exactly what Mom, Beth, and I did.
The three of us went together and took my 4Runner and trailer...and it came home packed!! My shopping list consisted of furniture for my office at work (it's so big that I bought a couple of comfy chairs for it), and a 1x5 Expedit and a pair of Alex carts for my scrap room. It was a long and exhausting shopping day (and I think three trips through the checkout before we were totally finished), and by the end of it I was so tired that I tried to use a box of crackers to pad some picture frames.
Don't ask. I don't even know what I was thinking (and the frames are fine).
As tired as I was that night, I still got up the very next morning and started putting the 1x5 unit together. I'd already worked on moving the two 5x5 Expedits to opposing corners (that was a fight in and of itself...and I did it all while in an air cast!!), so it was just a matter of putting the 1x5 in place and moving everything in until the corner looked like this.
That was on December 4th, and I've spent the intervening time working in 15 minute (or sometimes an hour if I'm lucky) increments to get it finished. And now it looks like this!
Let's take a little tour, shall we? I'll go back to this picture that was taken shortly before I moved the desk in since I think it'll be easier to refer to that way. Speaking of the desk, yes, it does cover those bottom four cubes of the right-hand Expedit, but those are items that I'm simply storing and hardly ever need to access, so no big deal.
The middle shelf is the new 1x5 unit that I put in to form a corner. I didn't bolt anything together (the Expedits aren't even bolted to the wall)- I simply snugged it all together and it fit rather nicely.
That row of green baskets mostly holds kits that I've either bought or made, and you'll notice that the top basket only has a couple of things in it. Room to grow is a good thing! Though I will say that I did purge quite a few items during this renovation- some of it was shared with my Mom and cousin, and another box of it is waiting to be taken to the next crop I go to at church to share with the girls there.
The basket below holds any kits I'm currently working with or projects in immediate progress. I use it mostly to hold photos and supplies that I've pulled out to use for assignments.
I also moved my scraps from the 12x12 drawers that they were in back into large zip-top bags in a basket. I just don't use scraps often enough to warrant the space that the drawers were taking up, and Mom was happy to take them for her own space.
I still store paper pretty much the same way I did when I originally set up the room- in Cropper Hopper vertical holders in the Expedit cubes. You can read more about my paper organization here.
I did move my 6x6 pads out of the boxes they were in and into open baskets to make them more accessible. I'm using them a lot more these days and wanted them handy, and putting them in baskets in Expedit cubes makes them easy to get to.
I also keep my newly found collection of Basic Grey kits here, along with page protectors and pretty much everything else that I originally stored in my first Expedit.
I still use baskets to store punches and keep a lot of my embellishments in color bins. This round of revamping was mostly just moving stuff around and not so much organization, so this stuff hasn't really changed.
The taller Pjas baskets (also from IKEA) fit perfectly in Expedit cubes, and I use them to hold things like office supplies, my adhesive stash, and some taller tool items.
I've also made my document and negative scanners easily accessible. This room also functions as my home office, and I need to be able to get to and use these items quickly! You can't see it in the photo, but there's a huge mass of cables behind this shelf running to a USB hub that in turn runs to my iMac so everything is connected all the time.
I still use this old bookcase to store mini album supplies (see that post here), and I've also moved my archived projects in progress from the cart I originally had them on (posted here) to 12x12 Iris cases that fit perfectly on the shelves.
The update that I think I'm most excited about is the addition of the two Alex carts from IKEA. I needed something that my Cricut Expression and my new Silhouette Cameo (an awesome Christmas present from my whole family) to sit on where I could get to them and use them without having to move a bunch of other stuff around. These two items are also permanently wired to the iMac at all times.
These carts are on casters, and I can easily roll one out a few inches when I need to make a cut, allowing the cutting mat to travel as far back as it needs to. I'm already using this cutter a lot more than any other I've ever had, and part of the reason for that is the convenient location!
The big draw of the Alex cart for me is the series of 6 flat, deep, shallow drawers- perfect for things like cutting mats, extra blades, and even my Cricut Gypsy!
I've also discovered just how much these units will hold! This drawer contains felt-cutting supplies for the Cricut.
And finally, finally, finally, all my glitters and inks have a home instead of just being jumbled up in a basket or other bin.
I've also finally got space for all my manual dies and embossing folders and plates.
And storage for stamps! I never really used my stamps much because they were pretty hard to sort through when I just had them thrown in a basket. I'm already using them more now that they're easier to sift through in these drawers!
And would you look at that- an empty drawer! I actually have two of them, though I may turn one into a Project Life station- not sure yet.
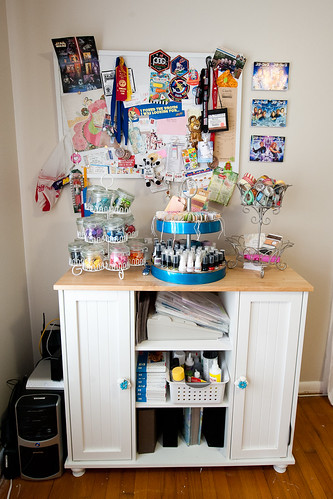
The wall off to the other side of the room is largely the same as it has been- the table is still there, and the copy stand is still in the closet.
The contents of the table have changed, though- it now holds some serving pieces from HomeGoods that I'm using to store baker's twine, mists, and decorative tape, as well as my new button storage.
I also moved the little dresser that I repainted and replaced the knobs on a couple of years ago to stand on the wall between the closet and the door- it's the perfect spot for my sewing machine!
Now that I've shown you the finished parts of my room, it's time to take a quick look at the scary and not-so-finished parts.
First, the Alex carts have a secret secondary purpose- they hide this hot mess of cables running from all my devices to my iMac!
And if you take a look from behind my desk (yes, that's Stargate: SG-1 playing on my computer :) ), you'll see that I've not yet made any progress on the business with a futon that I'm planning for that side of the room. And there are boxes of stuffed animals and a pile of bedding that I still need to deal with, but I can live with it for now.
And just how do I expect to fit a queen size futon in this space? Well, when it's a couch it'll be easy...but there's also an easy way to make room for the bed when it's folded out. Those Alex carts? That are on casters? They'll just roll back behind my desk (after unhooking the cables from the backs of the die cutters). The desk itself still has the furniture sliders on it and will be easy to move backward a foot or so to make room for the bed. In other words, no problem at all!! I'm guessing I could have this room company-ready in 10 minutes or less.
Whew! I'm pretty tired from just having written all that, but I've been wanting to do a full post like this on the evolution of my space for a long time now- it's so good to have it out there!


