It's not often that I make a papercrafting project that isn't a scrapbook page or the occasional card, but when I was asked to design a gift wrap project for the
Pink Paislee blog this week, something clicked in my brain and I came up with this...
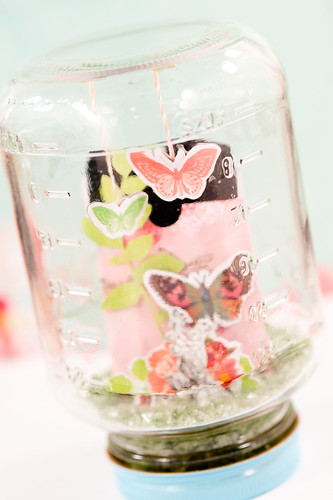
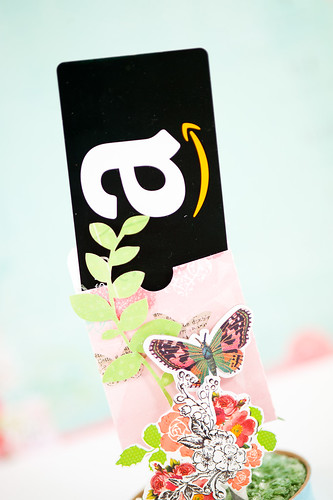
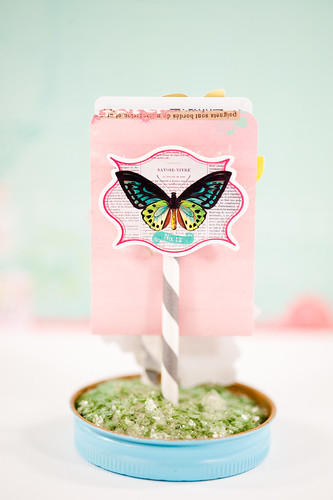
A gift card holder inside a spring-scene mason jar!
I don't know if it was the pretty
snowglobe-style mason jars at Anthropologie before Christmas or
Rhonna Farrer's fantastic snow scene mason jars that first inspired me to try a project like this, but as soon as I started to dream up my gift wrap project, I immediately knew that I would be making one and swapping out the Christmas elements for bits and pieces of Pink Paislee's Spring Jubilee collection.
You've probably already seen the photos of the finished project on the Pink Paislee blog, but I shot lots of in-process pictures, as well, so I could write up a tutorial to share with you!
I started the project with a Mason jar, of course (I think this one actually once held pasta sauce- Bertolli or Classico, maybe?), and spray-painted the lid in a color that coordinated with Spring Jubilee.
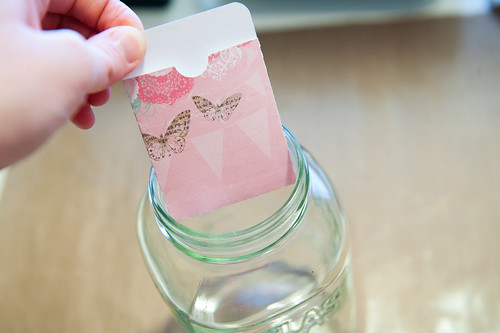
You'll need a fairly wide-mouthed jar for this- remember, a gift card has to fit inside it!
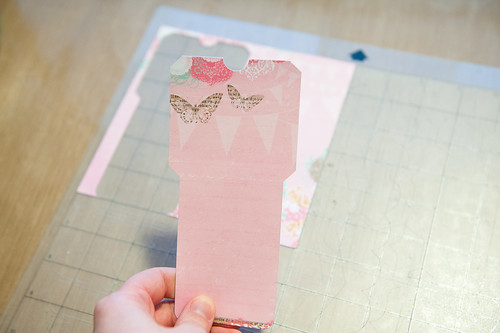
I used my Silhouette Cameo to cut a decorative pocket for the gift card. The file is from the Silhouette shape store (I've linked it up in the supply list), but I had to size it down quite a bit to get it to fit inside the jar. I cut it several times on scrap paper until I had the right balance of size that would both fit inside the jar and still hold the gift card.
With the main element cut and ready, it was time to start building the "scene." I've found that for applications like this, a hot glue gun is indispensable. I even managed to not burn myself this time, which is something I can't say about the
last time I tried to make an altered project.
Can you believe that I didn't have a hot glue gun until a couple of years ago? My Mom finally bought one for me when we were shopping at Michaels one day and I happened to mention that one would come in really handy when making cupcake toppers...now I can't imagine crafty projects like this without one!
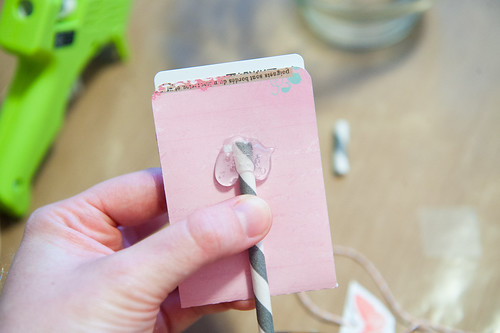
The gift card holder is sized to fit through the mouth of the jar at its widest point, so I knew I needed to pretty much dead-center it in the middle of the scene. I started by adhering a pretty paper straw (Amazon carries these now!) right in the middle of the jar's lid with a massive glob (that's a technical term) of hot glue.
After cutting the straw off to the proper height, I used another glob of glue to adhere it to the back of the gift card hold.
And since globs of hot glue aren't very pretty, I stuck a chipboard sticker from the Spring Jubilee line right over it, sandwiching the straw between it and the gift card holder.
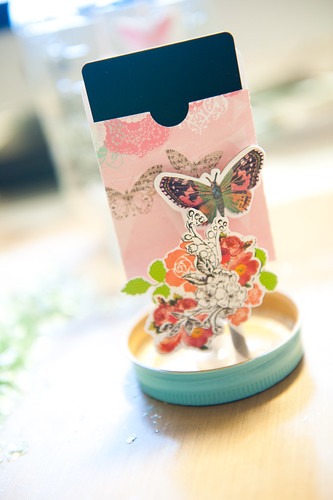
The next element in the scene is this pretty flower spray that I rubbed off of the Spring Jubilee press-on sheet onto a scrap of white cardstock before cutting it all out. This piece is mounted on a much shorter section of paper straw, and I didn't worry about the back of it since it'll later be hidden in fake grass. More on that in a minute...
And from there I continued to build the scene, first by adding a chipboard butterfly to the front of the gift card holder...
...and then by suspending chipboard butterflies from the top of the mason jar itself.
And if you're wondering how I stuck those in there, I started with a Glue Dot...and then
stuck my entire hand in the jar to adhere the Glue Dot inside the top. Yes, my hand did come out of the jar, and yes, I did pray the entire time I was doing it that Darren would not walk into my craft room and give me the look that says I've possibly sprouted a third head.
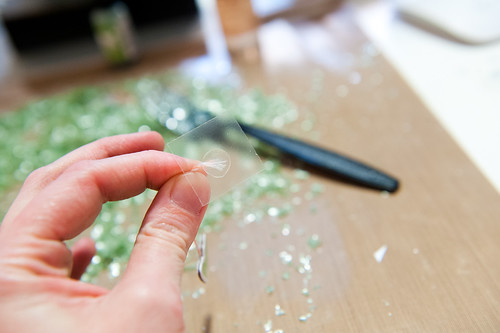
And now it's time for the fake grass. All the Christmas snowglobe scenes I linked to use some type of fake snow, like this package of mica flakes that I picked up on clearance (I'm talking 75% off clearance) at Anthropologie a couple of years ago. I bought it just because I like the vintage-y box, but I've actually used it in a couple of craft projects now (including making
ornaments at Christmas), so apparently it was a really good buy.
But I needed fake grass and not fake snow, so after a quick text message to crafty diva extraordinaire (and recent Ranger U graduate)
May Flaum for a little advice, I was off to Michaels for some green alcohol ink. I also picked up some blending solution to help lighten up the color.
I squirted a bit of ink and a lot of blending solution out onto my kraft mat (seriously, how did I ever do inky, mist-y stuff without this thing?), then mixed the concoction into a pile of the mica flakes. At first I used a plastic fork, but eventually I gave that up and used my hands instead. And, yes, I did have some funky green Hulk hands going on for a while!
At this point it was time to put everything together. I turned the jar mouth-side up again and poured the mica flakes inside (so the dangling butterflies are actually buried somewhere under them at this point). You can also see that I added a small spray of leaves cut on the Silhouette to the spring scene- I thought it needed a little something on that side to balance things out.
For the final assembly, I put the lid on the jar and screwed it closed...
...then flipped the whole thing over and shook the mica flakes into place.
And the project was finished!
I don't usually do off-the page projects, and I really don't mess with inks that often (except for mist splatters), so this project was really outside my comfort zone. I'm totally tickled with the way it turned out!
Supplies (click on images for product links):