This Month in My Scrap Room is based a regular series of posts by Sue Althouse, who graciously allowed me to use her idea on my own blog. Each month you'll find me documenting the little (and big) things that I'm working on to make my scrapbooking space more efficient so I can spend less time looking for things and more time playing with paper!
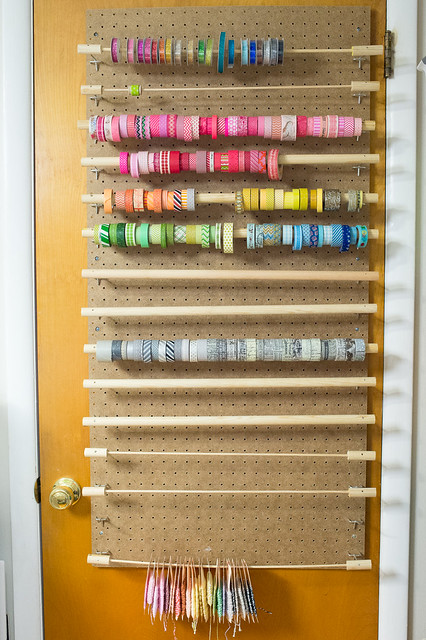
After last month's adventures in tearing my scrap room apart and building a massive new work table, I was happy to settle in and just use the room for a while. I did take some time, though, with Darren's help, to get my pegboard set up!
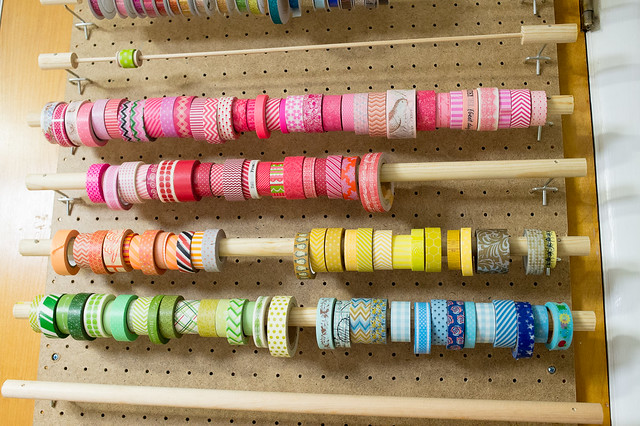
I've looked at tons of washi tape storage solutions including the Washi Wheel and using a thread spool rack. Nothing looked as easy and as space-saving, though, as the dowel solution I ran across on Scattered Thoughts of a Crafty Mom. I already had a piece of pegboard that we moved with us from our old house, so it was a fairly cost-effective install, too.
Darren picked up some 1/2" dowels from Home Depot and used a drill press to bore holes in the end of the dowels so they'd attach nicely to the 2" straight hooks that I picked up at Harbor Freight. The rods can be easily removed if needed, though it's pretty easy to just pull a length off of the roll right on the rack!
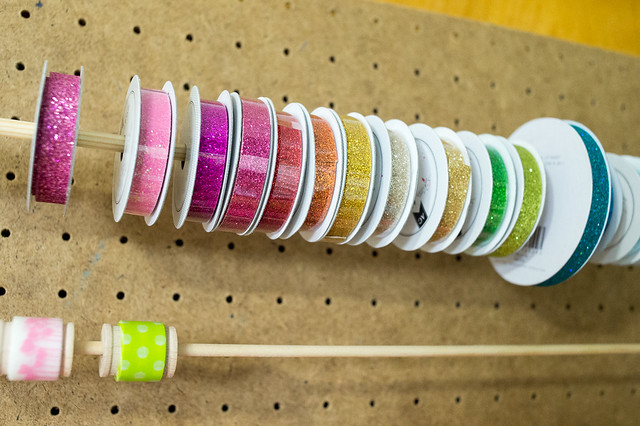
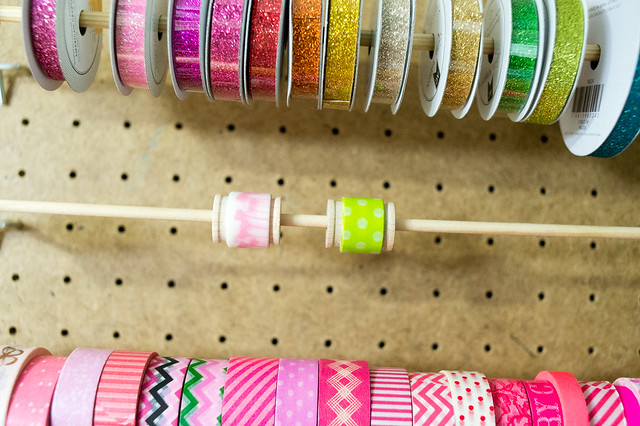
I have a few tape spools with narrower centers, including my American Crafts Glitter Tape and the little tape spools that come in the Citrus Twist Pocket Life Kits. To mount those, Darren picked up some narrower dowels and then cut small pieces of the larger diameter to use as end pieces to hold them in place. He's a genius with the drill press!
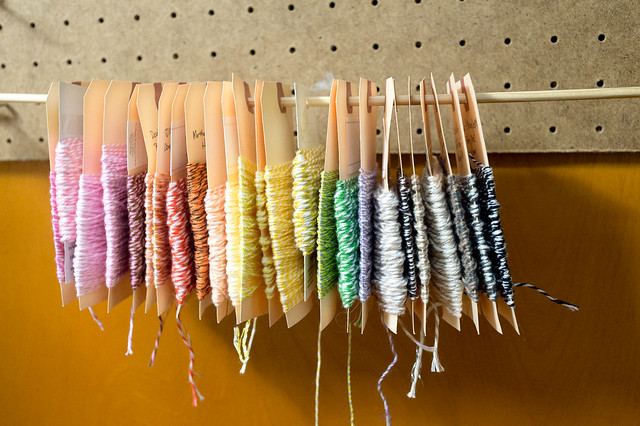
I hadn't originally planned to store my baker's twine on the pegboard, but the narrow little dowels are also perfect for stringing up a row of the little shipping tags that I wrap my twine around.
I'm still hanging things up on my new/old pegboard (and wondering why I have so much pink washi!), but I'm already finding that I'm using the tape more now that it's out and visible. And since it's on the back of the scrap room door, it's not really taking up any extra room- win-win!
I don't have any major plans for January in the scrap room. CHA will be taking up a lot of my time, but I am looking forward to consolidating some things. For the past year I've had to keep two separate stashes- my normal supplies, and then the supplies that were still in stock at Two Peas. Having to separate the two took up some extra space and made it difficult to find items, and I'm looking forward to streamlining everything now that my term with them is complete.
What about you guys? Any big plans for your scrapping space in the new year?
This Month in My Scrap Room : December 2013
Thursday, December 26, 2013
Thursday, October 31, 2013
This Month in My Scrap Room is based a regular series of posts by Sue Althouse, who graciously allowed me to use her idea on my own blog. Each month you'll find me documenting the little (and big) things that I'm working on to make my scrapbooking space more efficient so I can spend less time looking for things and more time playing with paper!
It's Halloween and my scrap room is looking just a bit...spooky.
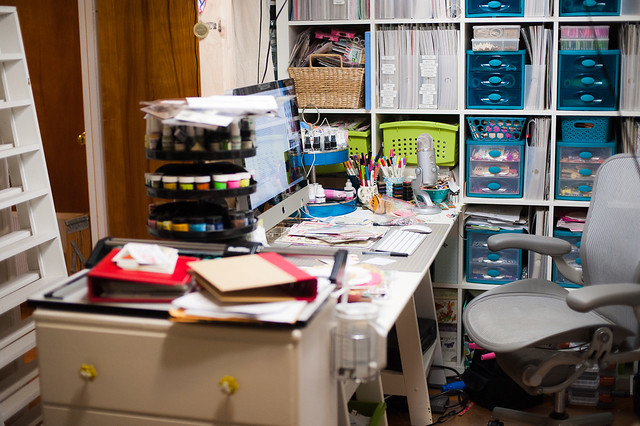
Seriously, guys, it is a big scary mess, and not just because of the Christmas album festivities that have been going on here this week (by the way, the Simple Stories Sn@p album giveaway is still open). I really haven't been doing much beyond basic cleaning between projects (oh, so, so many projects!) in my office lately, which is why July was the last time I posted one of these scrap room updates. There were a few things that just couldn't wait any longer, though, so I've launched into a few organizational tasks that'll be ongoing here for the next little while.
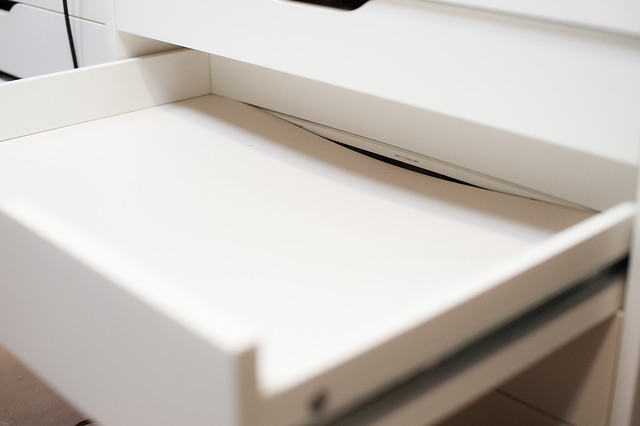
This month most of my projects centered around the two Alex carts that are currently behind my scrapping desk. I used to store punches and washi tape in them, but apparently the weight of the items in the drawers was more than they could take and, well, this happened...
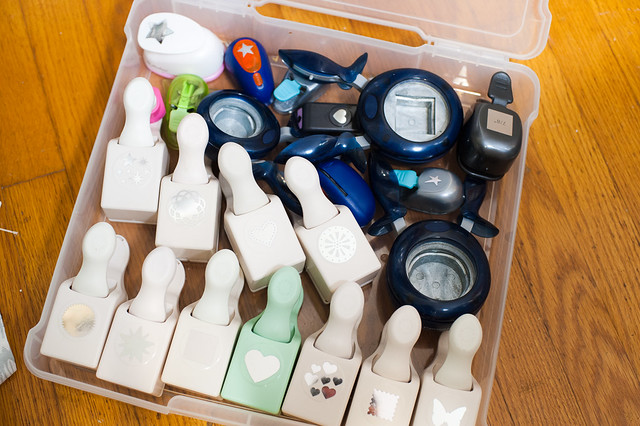
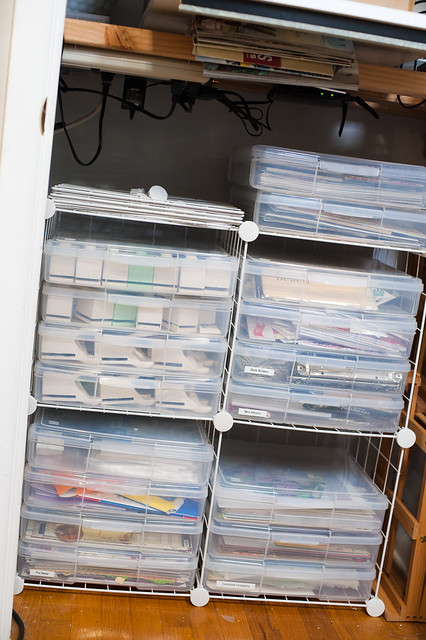
The drawers look a little sad, don't they? I think they'll be easy to repair, but first I had to get those heavy punches out of them (the washi will move when I've finished making its new home) and into something that was a little more sturdy. I researched punch storage ideas on Pinterest and considered everything from an over-the-door shoe holder to curtain rods on the wall before deciding on something super easy- 12x12 plastic Iris cases in a set of wire mesh cubes that I picked up at Target.
I already had the Iris cases on hand and had been meaning to clean some old product out of them anyway, so except for the wire cubes (about $25), I didn't have to buy anything new to do this! The wire cubes now live in my scrap room closet (the Antonius and Raskog carts that were in there are destined for a new home in my scrap room as soon as I finish another construction project I have planned, also with existing items), and the punches are sorted roughly by theme- animals, basic shapes, holidays, etc. The other Iris cases hold either design team product that I have to keep separate from the rest of my supplies or unfinished projects.
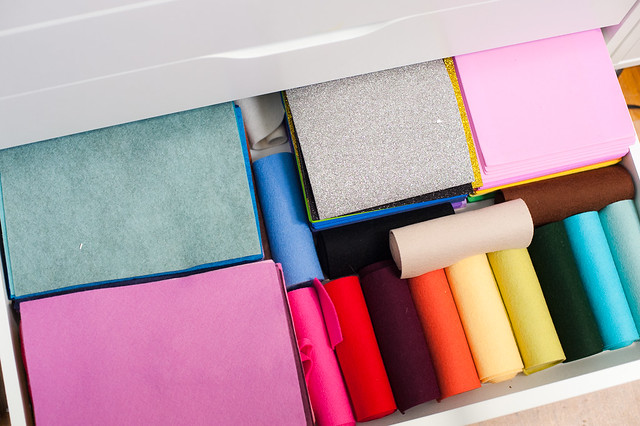
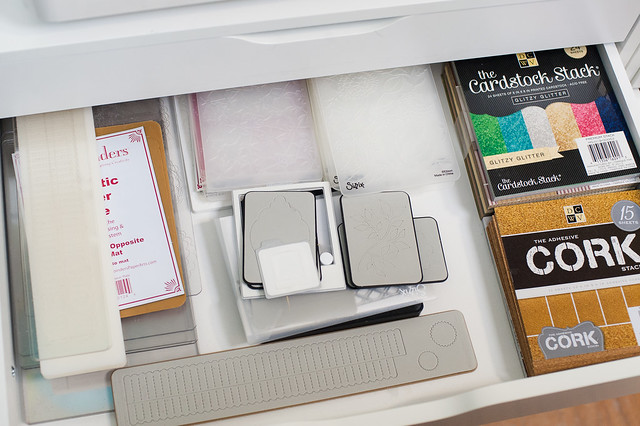
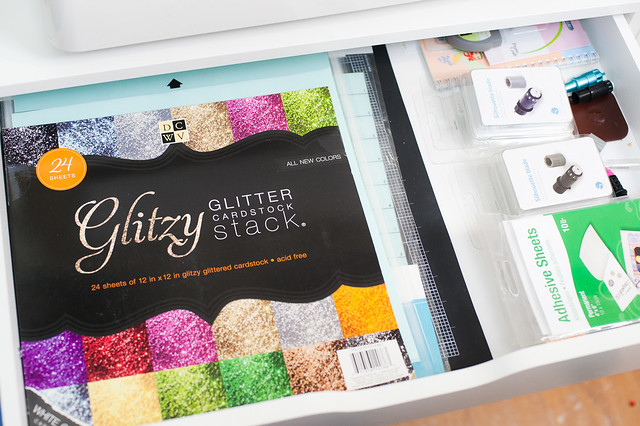
One of my two Alex carts (the one that didn't end up with broken drawers) is destined for my Mom's scrap room as soon as I've cleared it out, and I'm going to use the remaining one to hold lighter items for die cutting. I've already filled one drawer with 6"x9" felt (I love this sampler pack from Benzie's on Etsy) and foam sheets, and a couple of other drawers hold dies, other die-cutable mediums like glitter and cork pads from DCWV, and Silhouette mats and tools.
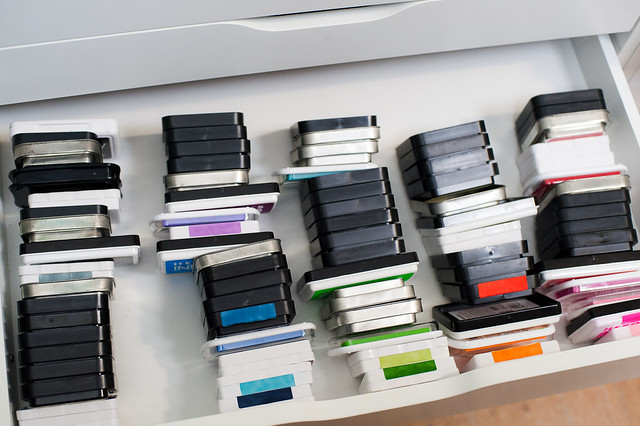
I was also super inspired by this ink storage post by Jennifer McGuire, especially the part where she showed all of her ink pads "filed" in the drawer of an Alex cart. I don't have nearly the collection that Jen does- it's her job after all!- so all of my ink pads fit into one of the deeper Alex drawers with room to spare.
I'm also slowly adding labels to the side of my ink pads showing the color of each, and every once in a while I'll turn on an episode of Stargate, pick up some ink pads and labels, and get a stack of them labeled in a super low-key and no-hurry fashion.
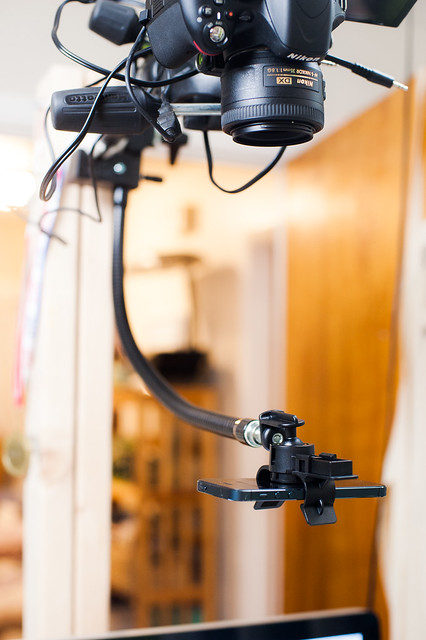
I also tweaked my video setup this month. For most things the Nikon D5100 is great, but for kit videos where the focus changes constantly it was making some viewers a little seasick. There's not enough light in the room (even with the softboxes) to set the f-stop high enough to have everything from the top of the desk up to the lens in focus, so I've had to add my iPhone (which for some reason is better about that than the DSLR!) back into the mix. I'll still be using the D5100 for process videos where everything is flat on the desk (it has more storage space than my iPhone, which is why I switched in the first place), but I've got an extra mounting arm in place now so that I can use the iPhone when needed and rotate the mounting arm out of the way when I need to use the D5100.
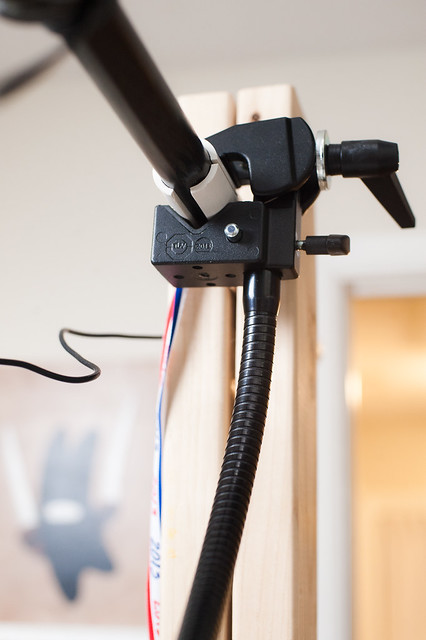
The setup here is super simple- a Manfrotto Super Clamp attached to the D5100's monopod, a Manfrotto Heavy Duty Flex Arm that attaches to the Super Clamp, and then an iPhone tripod mount that attaches to the flex arm. I've already filmed two kit videos with it and it works great, so hopefully this will be a good solution.
During the summer I was alternately scrapping up a storm in my office or spending time outside, but now that it's getting colder I'll be working on a little more organization. I have several other projects on the radar for the winter months, including:
It's Halloween and my scrap room is looking just a bit...spooky.
Seriously, guys, it is a big scary mess, and not just because of the Christmas album festivities that have been going on here this week (by the way, the Simple Stories Sn@p album giveaway is still open). I really haven't been doing much beyond basic cleaning between projects (oh, so, so many projects!) in my office lately, which is why July was the last time I posted one of these scrap room updates. There were a few things that just couldn't wait any longer, though, so I've launched into a few organizational tasks that'll be ongoing here for the next little while.
This month most of my projects centered around the two Alex carts that are currently behind my scrapping desk. I used to store punches and washi tape in them, but apparently the weight of the items in the drawers was more than they could take and, well, this happened...
The drawers look a little sad, don't they? I think they'll be easy to repair, but first I had to get those heavy punches out of them (the washi will move when I've finished making its new home) and into something that was a little more sturdy. I researched punch storage ideas on Pinterest and considered everything from an over-the-door shoe holder to curtain rods on the wall before deciding on something super easy- 12x12 plastic Iris cases in a set of wire mesh cubes that I picked up at Target.
I already had the Iris cases on hand and had been meaning to clean some old product out of them anyway, so except for the wire cubes (about $25), I didn't have to buy anything new to do this! The wire cubes now live in my scrap room closet (the Antonius and Raskog carts that were in there are destined for a new home in my scrap room as soon as I finish another construction project I have planned, also with existing items), and the punches are sorted roughly by theme- animals, basic shapes, holidays, etc. The other Iris cases hold either design team product that I have to keep separate from the rest of my supplies or unfinished projects.
One of my two Alex carts (the one that didn't end up with broken drawers) is destined for my Mom's scrap room as soon as I've cleared it out, and I'm going to use the remaining one to hold lighter items for die cutting. I've already filled one drawer with 6"x9" felt (I love this sampler pack from Benzie's on Etsy) and foam sheets, and a couple of other drawers hold dies, other die-cutable mediums like glitter and cork pads from DCWV, and Silhouette mats and tools.
I was also super inspired by this ink storage post by Jennifer McGuire, especially the part where she showed all of her ink pads "filed" in the drawer of an Alex cart. I don't have nearly the collection that Jen does- it's her job after all!- so all of my ink pads fit into one of the deeper Alex drawers with room to spare.
I'm also slowly adding labels to the side of my ink pads showing the color of each, and every once in a while I'll turn on an episode of Stargate, pick up some ink pads and labels, and get a stack of them labeled in a super low-key and no-hurry fashion.
I also tweaked my video setup this month. For most things the Nikon D5100 is great, but for kit videos where the focus changes constantly it was making some viewers a little seasick. There's not enough light in the room (even with the softboxes) to set the f-stop high enough to have everything from the top of the desk up to the lens in focus, so I've had to add my iPhone (which for some reason is better about that than the DSLR!) back into the mix. I'll still be using the D5100 for process videos where everything is flat on the desk (it has more storage space than my iPhone, which is why I switched in the first place), but I've got an extra mounting arm in place now so that I can use the iPhone when needed and rotate the mounting arm out of the way when I need to use the D5100.
The setup here is super simple- a Manfrotto Super Clamp attached to the D5100's monopod, a Manfrotto Heavy Duty Flex Arm that attaches to the Super Clamp, and then an iPhone tripod mount that attaches to the flex arm. I've already filmed two kit videos with it and it works great, so hopefully this will be a good solution.
During the summer I was alternately scrapping up a storm in my office or spending time outside, but now that it's getting colder I'll be working on a little more organization. I have several other projects on the radar for the winter months, including:
- Build a new stand-up scrapping table using two bookcases and a sheet of MDF (that I already have!).
- Build a dedicated computer desk separate from my scrapping table (no more mist splatters on the iMac screen!).
- Install pegboard on the back of the scrap room door to hold washi tape, markers, and other items.
- Clear out all the "decorative" items, including the tissue paper pom poms (you can see those here) to freshen up the look of the whole space.
- New paint, mist, Distress Stain, and embossing powder storage (also using existing stuff- yeah, baby!).
I'll have details and some in-progress photos to share for these items in future scrap room posts, so stay tuned!
Thursday, October 10, 2013
Today's post is a long, photo-filled one because I have both a new layout and a tutorial to share! If you've been by the Crate Paper blog today, then you've seen the news that they asked me to join their design team, and I'm thrilled to have the chance to work with their new products! My first assignment was to write a Crate Style post on any topic of my choosing, and I chose the theme of DIY for both my layout and my project.
Supplies:
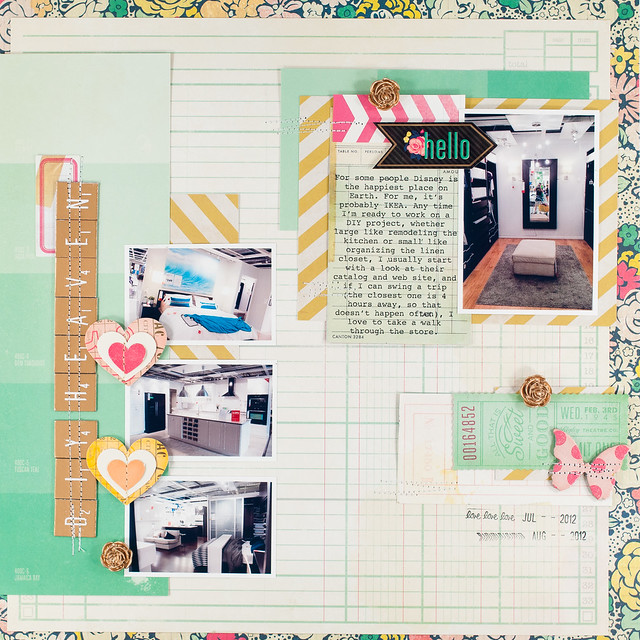
I'll start with the layout, using Maggie Holmes' Flea Market collection and a few photos that I snapped on a visit to IKEA. Since I have a slight addiction to DIY (and also to all things related to organizing), IKEA is basically my crack house. I don't get to go often because the closest one is a little over four hours away, but last summer I was working on a project for work that would often send me on road trips where I would drive right past one of their stores. You can bet that I stopped in almost every time!
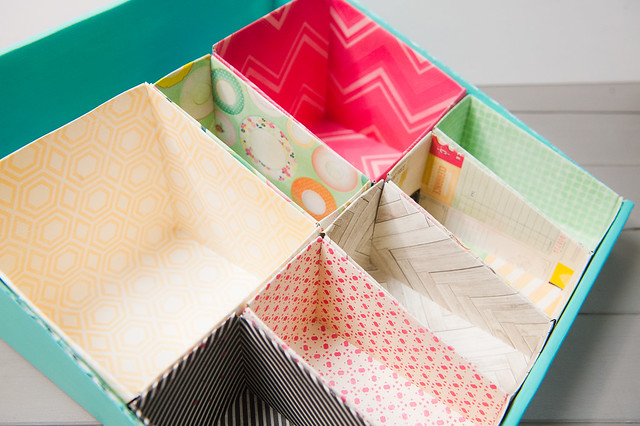
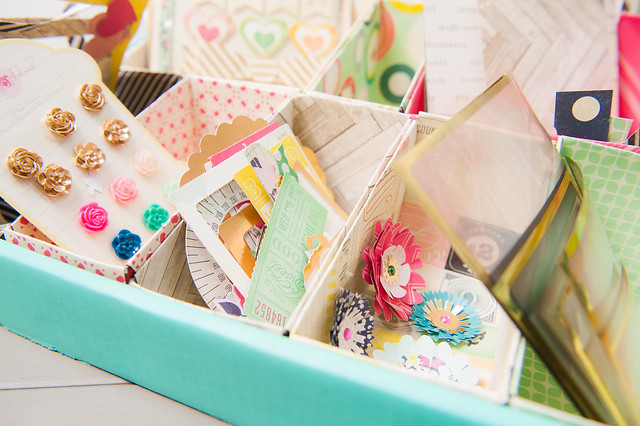
With DIY on the brain and the gorgeous Flea Market papers on my desk, I decided to pick a couple of projects that I'd recently spotted while browsing Pinterest- a desk organizer for Project Life items and drawer organizers made from empty snack food boxes- and combine them into one. I love it, and it turned out looking a little something like this...
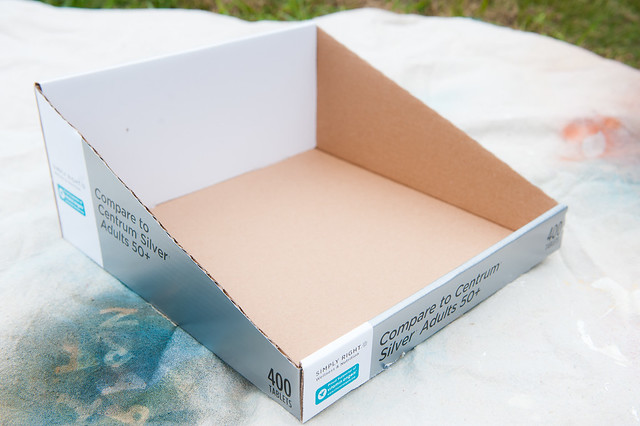
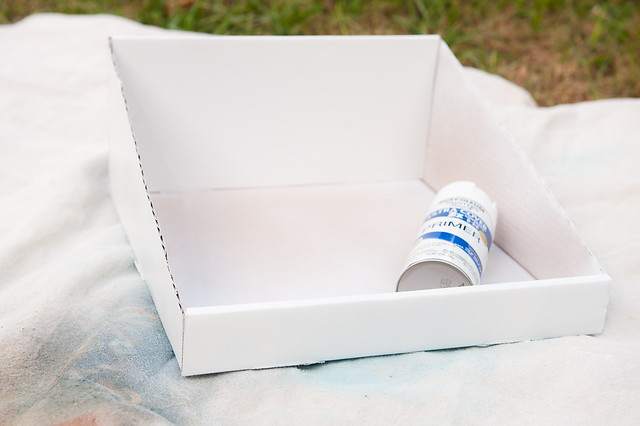
It was also super easy and inexpensive to make, though it did take a bit of time. I started with this humble box that I brought home after a shopping trip at Sam's Club as a base and gave it a couple of quick coats of spray primer from a can that I had left over from a previous project.
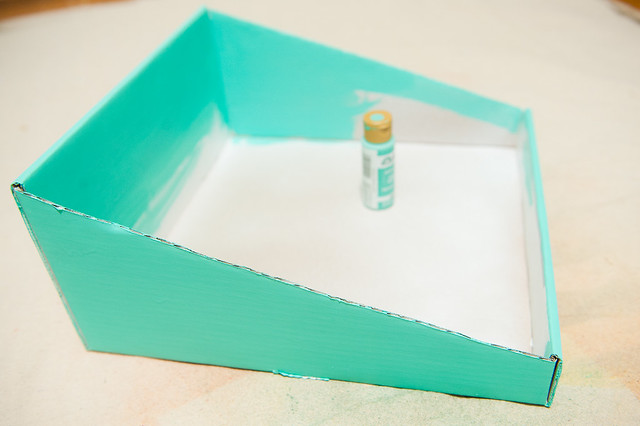
Using a bottle of Folk Art craft paint in Patina, I then painted the outside of the box as well as most of the inside of the back and a few inches of the sides. Since the divider boxes were going to cover up most of the base and sides, I didn't worry about painting the entire thing.
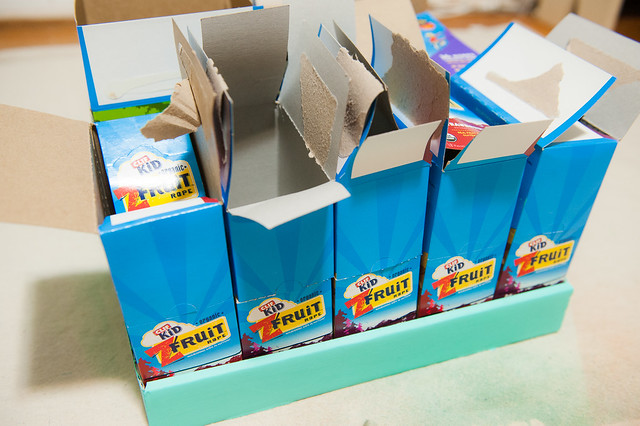
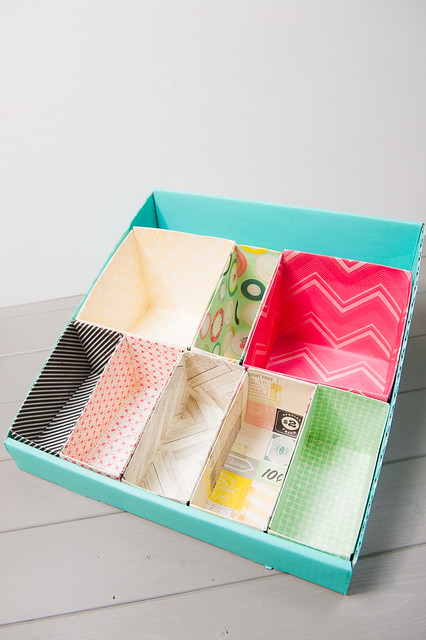
Speaking of divider boxes, those were my next task. I used a few different sizes of snack food boxes (yes, I do love my Clif Fruit Ropes!) to fill the front of the box, then marked off the edges of the box with a Sharpie and cut all of the inner boxes to match the slope of the sides.
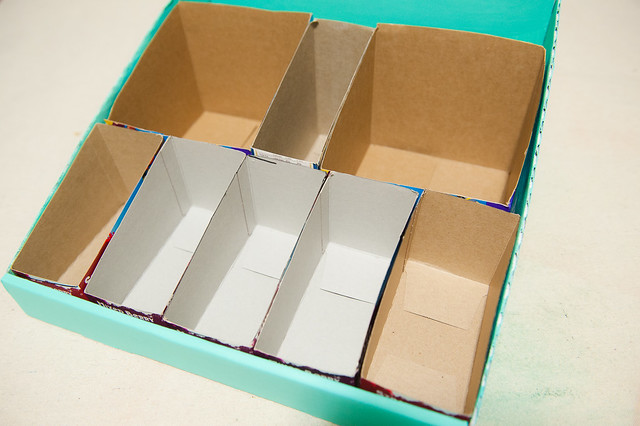
I did leave a few inches in the back open, making the perfect spot to hold 12x12 papers, stickers, and chipboard sheets.
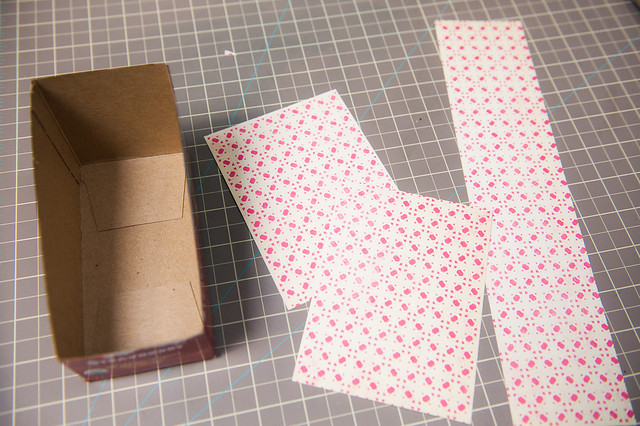
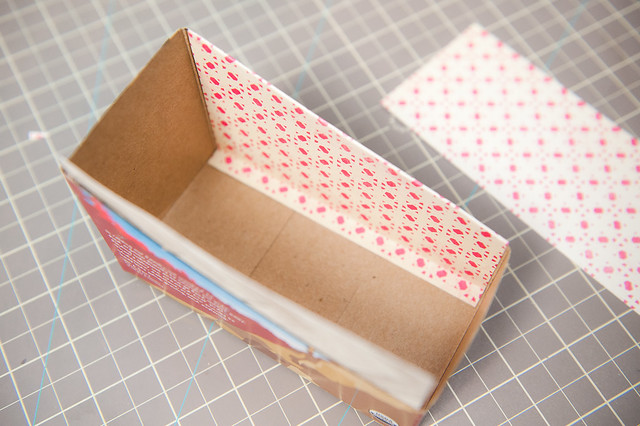
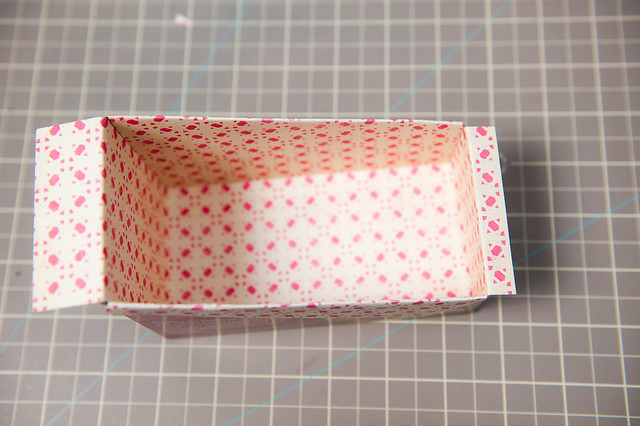
Once I got into a rhythm with covering the inner boxes, they were really easy. I wanted to minimize the amount of paper used while still covering all of the visible portions of the box, so I cut two smaller pieces (one for each side) and one long strip to cover the inside of the front, back, and bottom of the box.
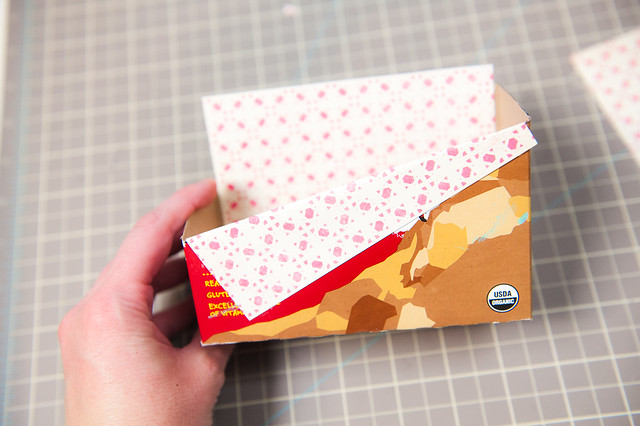
I scored the side pieces along one edge so that a tiny bit would wrap down to the bottom of the box and folded any excess over the top to cover the raw edges.
Then it was just a matter of adding in the longer strip of paper to cover the rest of the surface area!
After all of the inner boxes were covered, I placed them all back into the base box, using hot glue to make sure they stayed in place.
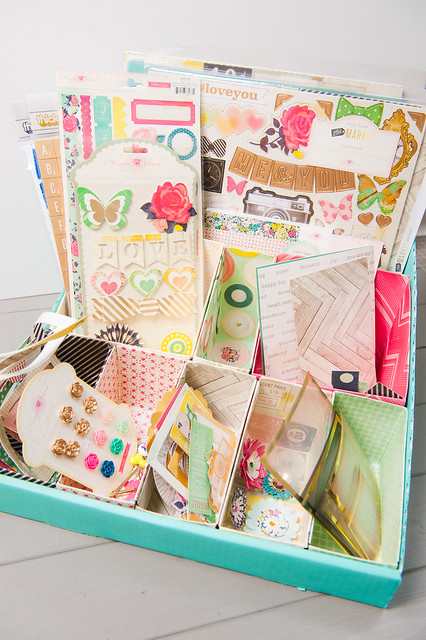
And now this organizer is the perfect place to hold the current kit or collection that I'm working with at the time. I filled it up with the Flea Market collection before scrapbooking the layout above, and right now it's on my desk filled with the October kits from Citrus Twist. I'm liking it even more than my tray solution for kit scrapping!
Supplies:
I'll start with the layout, using Maggie Holmes' Flea Market collection and a few photos that I snapped on a visit to IKEA. Since I have a slight addiction to DIY (and also to all things related to organizing), IKEA is basically my crack house. I don't get to go often because the closest one is a little over four hours away, but last summer I was working on a project for work that would often send me on road trips where I would drive right past one of their stores. You can bet that I stopped in almost every time!
With DIY on the brain and the gorgeous Flea Market papers on my desk, I decided to pick a couple of projects that I'd recently spotted while browsing Pinterest- a desk organizer for Project Life items and drawer organizers made from empty snack food boxes- and combine them into one. I love it, and it turned out looking a little something like this...
It was also super easy and inexpensive to make, though it did take a bit of time. I started with this humble box that I brought home after a shopping trip at Sam's Club as a base and gave it a couple of quick coats of spray primer from a can that I had left over from a previous project.
Using a bottle of Folk Art craft paint in Patina, I then painted the outside of the box as well as most of the inside of the back and a few inches of the sides. Since the divider boxes were going to cover up most of the base and sides, I didn't worry about painting the entire thing.
Speaking of divider boxes, those were my next task. I used a few different sizes of snack food boxes (yes, I do love my Clif Fruit Ropes!) to fill the front of the box, then marked off the edges of the box with a Sharpie and cut all of the inner boxes to match the slope of the sides.
I did leave a few inches in the back open, making the perfect spot to hold 12x12 papers, stickers, and chipboard sheets.
Once I got into a rhythm with covering the inner boxes, they were really easy. I wanted to minimize the amount of paper used while still covering all of the visible portions of the box, so I cut two smaller pieces (one for each side) and one long strip to cover the inside of the front, back, and bottom of the box.
I scored the side pieces along one edge so that a tiny bit would wrap down to the bottom of the box and folded any excess over the top to cover the raw edges.
Then it was just a matter of adding in the longer strip of paper to cover the rest of the surface area!
After all of the inner boxes were covered, I placed them all back into the base box, using hot glue to make sure they stayed in place.
And now this organizer is the perfect place to hold the current kit or collection that I'm working with at the time. I filled it up with the Flea Market collection before scrapbooking the layout above, and right now it's on my desk filled with the October kits from Citrus Twist. I'm liking it even more than my tray solution for kit scrapping!
Tuesday, July 30, 2013
This Month in My Scrap Room is based a regular series of posts by Sue Althouse, who graciously allowed me to use her idea on my own blog. Each month you'll find me documenting the little (and big) things that I'm working on to make my scrapbooking space more efficient so I can spend less time looking for things and more time playing with paper!
Most of the changes in my scrap room this month are thanks to Darren, who installed and built some custom pieces to make it easier for me to shoot videos. And while I know that filming videos isn't exactly related to the scrapbooking process itself, it's something I have to do on a semi-regular basis, so these changes make it faster for me to get through the video setup part and on to the actual scrapping.
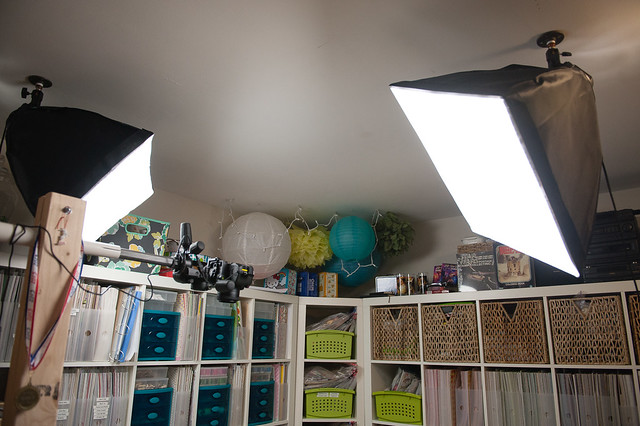
First, my lighting softboxes got ceiling mounted! This was a big deal for me since they were previously on tripods that I was continually tripping over. It turned out that the perfect place to set them up for shooting was also directly in my walking path in two areas of my scrap space, and having them in the way made me cranky. Cranky + trying to shoot videos is not a pretty combination, so I'm happy to have them overhead now!
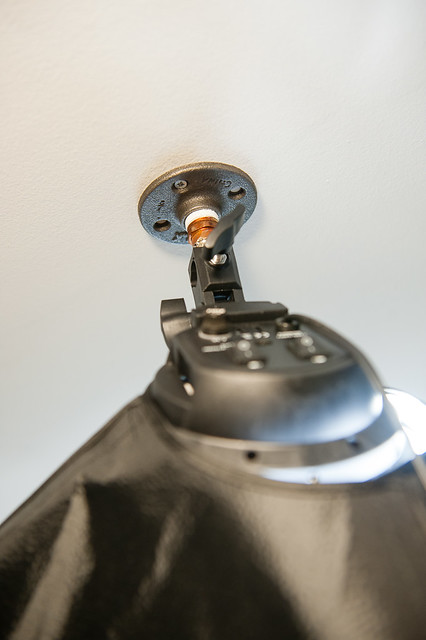
The mounts were built using about $10 worth of plumbing supplies from Home Depot and a little solder to hold it all together. The cords kind of hang down randomly in the middle of the room right now, but Darren has something in mind to fix that down the road. For now, it's awesome!
The second change to my video setup is the camera + mount.
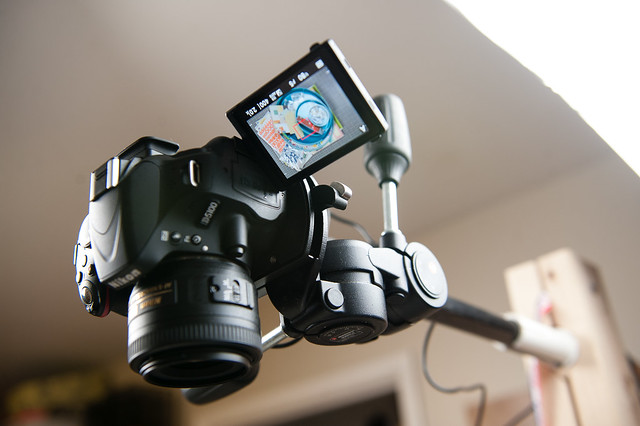
Previously I'd been filming on my iPhone using quickly thrown together mount that Darren built for me last fall, but then my iPhone's memory started to get filled up with apps and music. I had a choice between continually pausing shooting to clear off the iPhone memory (a pain), upgrading to a new iPhone with larger storage (or buying an iPod Touch to film on), or using a different type of video camera altogether. I wavered back and forth between those last two options for a couple of months before finding a factory refurbished Nikon D5100 for a steal at Cameta Camera, and I decided that a DSLR capable of HD video for the same price as an iPod Touch was a great buy and went that route. It's taken a little getting used to since the D5100 works a little differently than my iPhone in terms of setting the exposure and the autofocus system, but we've finally come to an understanding, and it's been a great little camera to use!
The camera mount is quite the piece of engineering, and Darren did a great job on it! We'll be making one change to it before too long, though (and I'll probably paint it at some point, too). Right now the camera is attached to the center pole of my tripod, but I'd like to reassemble my tripod soon so I'll be using a monopod in the mount instead. It's here in the scrap room and ready to use, but I was waiting for Darren to get back from his trip to South Africa last week to install it.
Oh, and one other fun addition to the video setup? A new microphone!
When I switched away from using my iPhone, I also switched over from using the iPhone's headphones + mic for filming to a Blue Yeti microphone, and I love everything about it. The sound is awesome, and I think it looks pretty cool, too.
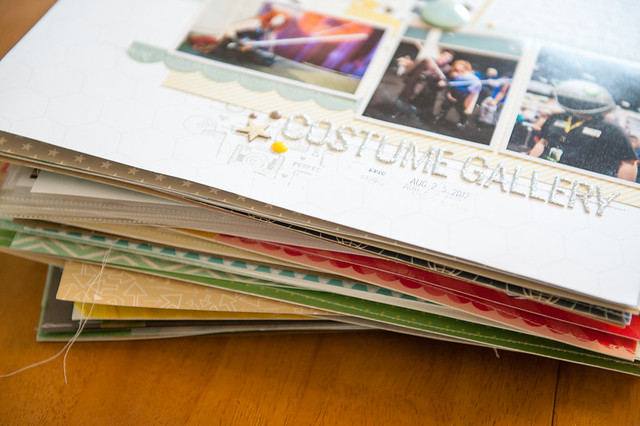
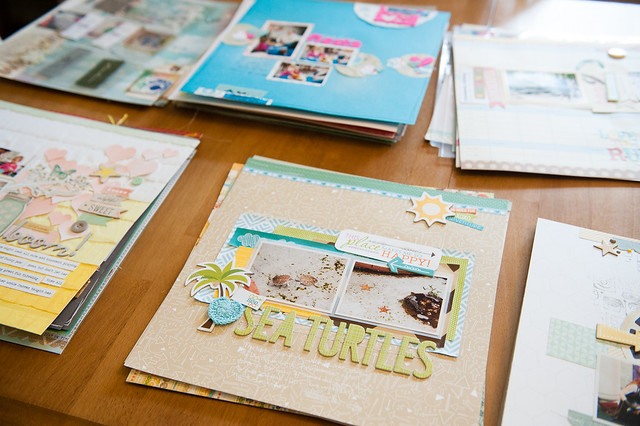
One last thing I did in my scrap room this month was to put about 40 layouts into albums! These had been laying in a pile on the copy stand, and I had to move them every time I needed to photograph a new page. I finally sat down one day, sorted them all out by year (I don't scrap chronologically, but I do file my layouts that way), and then slipped them into the proper places in their albums. It's nice to have that job done, and I'm going to try to not let them pile up like that again.
That's it for the changes in my scrap room this month! The next few weeks are busy scrapping-wise, and I'd much rather scrap than organize, so August's changes may be a bit light. We'll see how it goes, though- if something in my current storage system starts to really bug me I might just have to stop and fix it!
Note: I've drawn a winner for last week's Two Peas giveaway! Congrats to Kelly O! Please check this post for details on getting in touch with me to claim your prize.
Most of the changes in my scrap room this month are thanks to Darren, who installed and built some custom pieces to make it easier for me to shoot videos. And while I know that filming videos isn't exactly related to the scrapbooking process itself, it's something I have to do on a semi-regular basis, so these changes make it faster for me to get through the video setup part and on to the actual scrapping.
First, my lighting softboxes got ceiling mounted! This was a big deal for me since they were previously on tripods that I was continually tripping over. It turned out that the perfect place to set them up for shooting was also directly in my walking path in two areas of my scrap space, and having them in the way made me cranky. Cranky + trying to shoot videos is not a pretty combination, so I'm happy to have them overhead now!
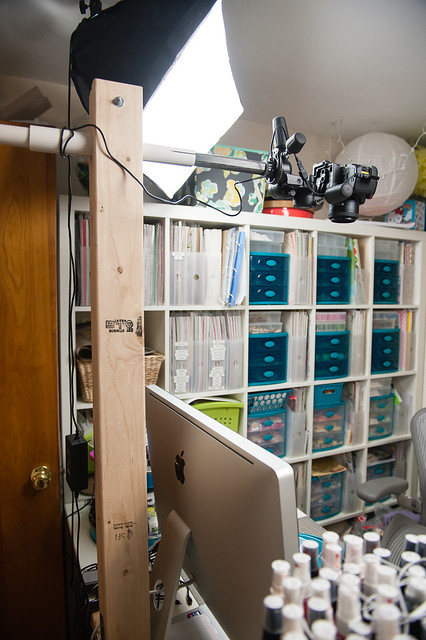
The mounts were built using about $10 worth of plumbing supplies from Home Depot and a little solder to hold it all together. The cords kind of hang down randomly in the middle of the room right now, but Darren has something in mind to fix that down the road. For now, it's awesome!
The second change to my video setup is the camera + mount.
Previously I'd been filming on my iPhone using quickly thrown together mount that Darren built for me last fall, but then my iPhone's memory started to get filled up with apps and music. I had a choice between continually pausing shooting to clear off the iPhone memory (a pain), upgrading to a new iPhone with larger storage (or buying an iPod Touch to film on), or using a different type of video camera altogether. I wavered back and forth between those last two options for a couple of months before finding a factory refurbished Nikon D5100 for a steal at Cameta Camera, and I decided that a DSLR capable of HD video for the same price as an iPod Touch was a great buy and went that route. It's taken a little getting used to since the D5100 works a little differently than my iPhone in terms of setting the exposure and the autofocus system, but we've finally come to an understanding, and it's been a great little camera to use!
The camera mount is quite the piece of engineering, and Darren did a great job on it! We'll be making one change to it before too long, though (and I'll probably paint it at some point, too). Right now the camera is attached to the center pole of my tripod, but I'd like to reassemble my tripod soon so I'll be using a monopod in the mount instead. It's here in the scrap room and ready to use, but I was waiting for Darren to get back from his trip to South Africa last week to install it.
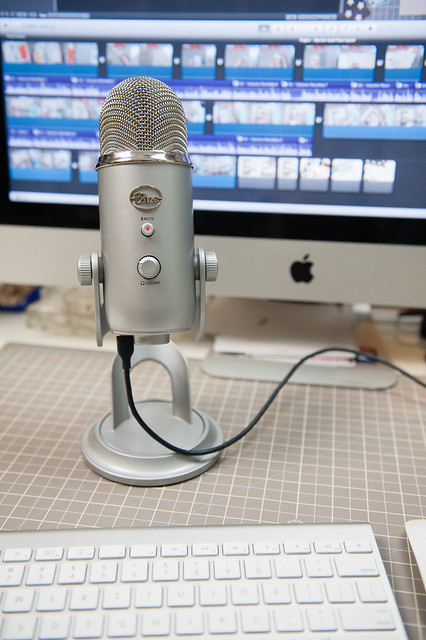
Oh, and one other fun addition to the video setup? A new microphone!
When I switched away from using my iPhone, I also switched over from using the iPhone's headphones + mic for filming to a Blue Yeti microphone, and I love everything about it. The sound is awesome, and I think it looks pretty cool, too.
One last thing I did in my scrap room this month was to put about 40 layouts into albums! These had been laying in a pile on the copy stand, and I had to move them every time I needed to photograph a new page. I finally sat down one day, sorted them all out by year (I don't scrap chronologically, but I do file my layouts that way), and then slipped them into the proper places in their albums. It's nice to have that job done, and I'm going to try to not let them pile up like that again.
That's it for the changes in my scrap room this month! The next few weeks are busy scrapping-wise, and I'd much rather scrap than organize, so August's changes may be a bit light. We'll see how it goes, though- if something in my current storage system starts to really bug me I might just have to stop and fix it!
Note: I've drawn a winner for last week's Two Peas giveaway! Congrats to Kelly O! Please check this post for details on getting in touch with me to claim your prize.
Thursday, June 27, 2013
This Month in My Scrap Room is based a regular series of posts by Sue Althouse, who graciously allowed me to use her idea on my own blog. Each month you'll find me documenting the little (and big) things that I'm working on to make my scrapbooking space more efficient so I can spend less time looking for things and more time playing with paper!
This month has been a quiet one for scrappy organization around here, but I have worked on a few little projects that have made some supplies and finished projects so much easier to find, use, and enjoy!
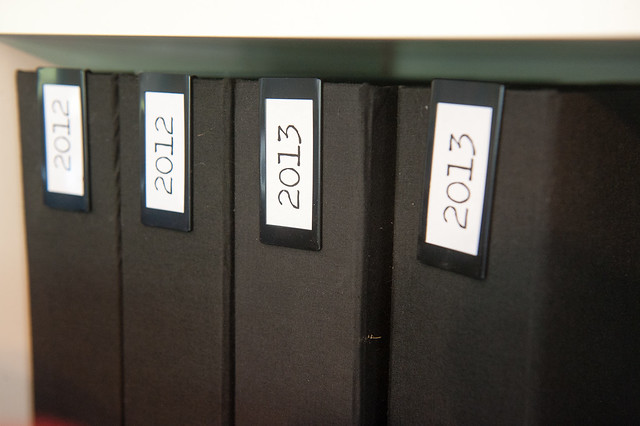
Finally, almost two years after ordering these binder spine labels from Amazon, I finally took the time to finish labeling all of my albums. I use American Crafts 12x12 D-Ring binders for my layouts, and these little black tabs fit perfectly (and snugly, so no falling off!) over the edges. I didn't use the paper tabs that came with the labels and printed my own out instead so I could use my favorite Traveling Typewriter font.
Most of my albums are labeled by year with a few special albums- vacations, holidays, etc.- thrown in the mix.
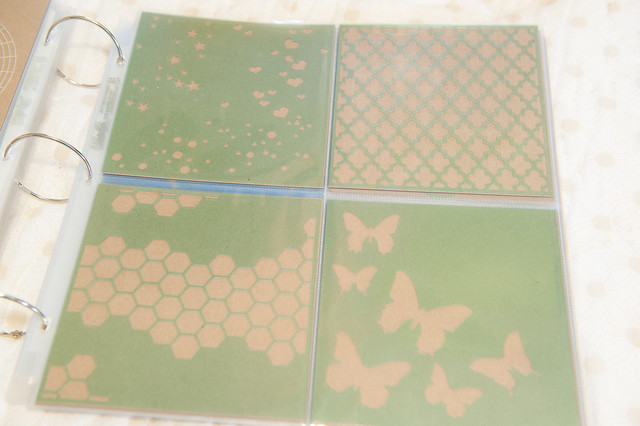
After falling in love with Heidi Swapp's new masks at Michaels, I found myself in need of a way to organize all of my stencils and templates to make them easy to look through. Previously I'd been just throwing them in a drawer in one of my IKEA Alex carts, but they were getting tangled up and torn (not to mention they were a pain to look through, meaning I rarely used them), so I went searching for another solution.
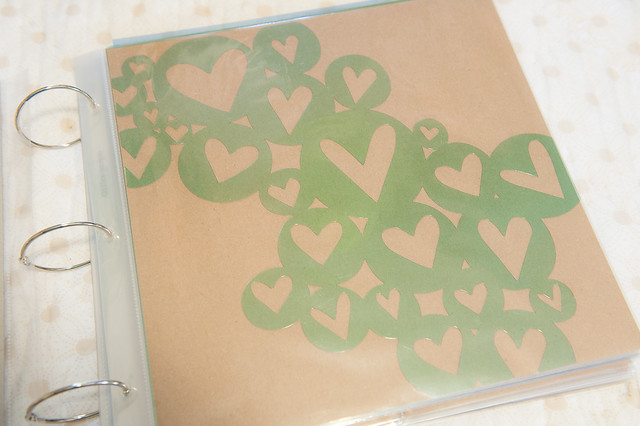
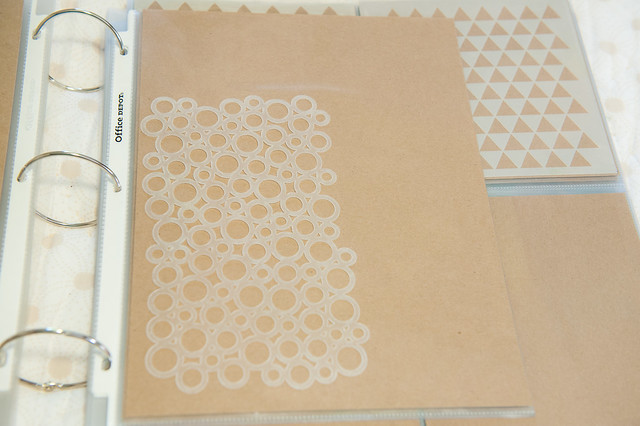
This post on Cocoa Daisy's blog turned out to be the perfect solution for me since I already had large binder rings, some old 12x12 post-bound page protectors, and 8.5x11 sleeves on hand. I did buy a package of We R Memory Keepers pages designed to hold four 6x6 layouts on a 12x12 page, though, since I had so many 6x6 templates.
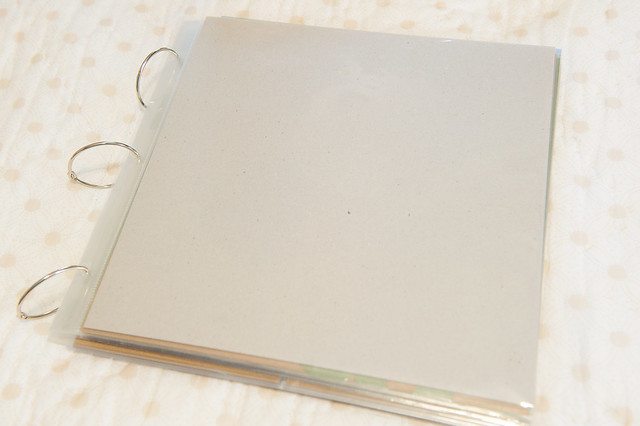
I'm not quite sure what I want to do with the cover yet, so for now it's just a sheet of plain chipboard (also just laying around the scrap room) tucked inside another of the post-bound page protectors. I'm sure I'll deck it out sometime when I'm feeling inspired, but for now I'm just enjoying having all of my misting masks so easily accessible!
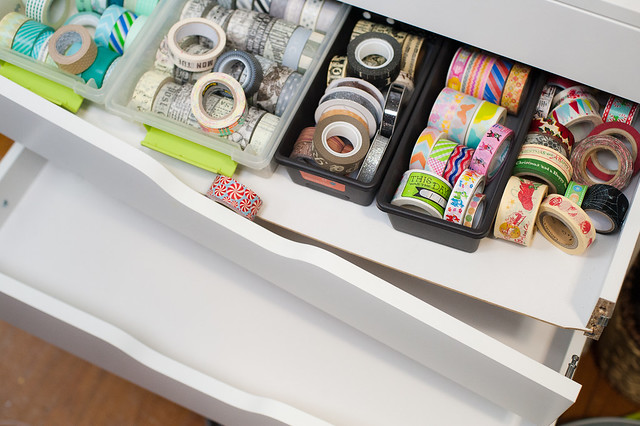
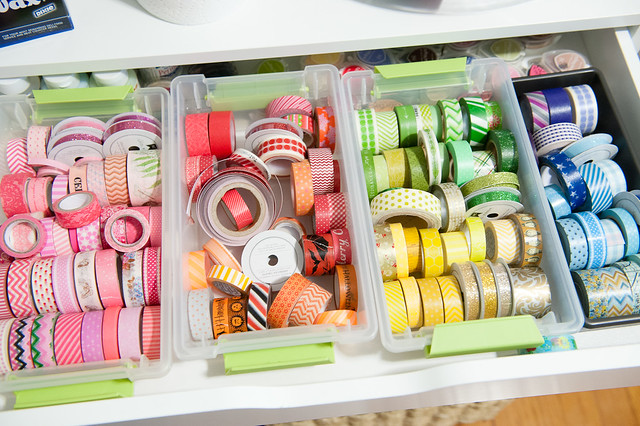
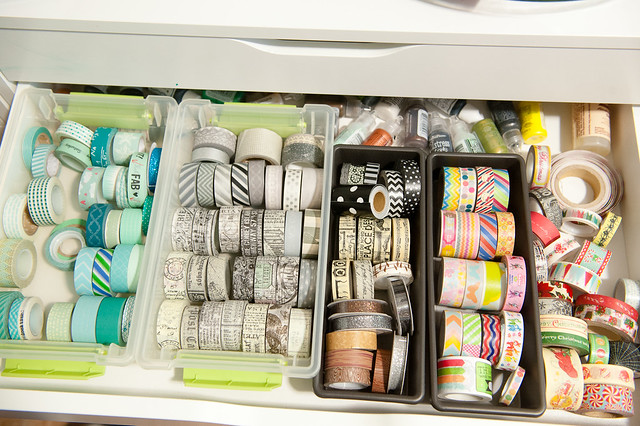
My washi tape also got moved to a new location. Previously I had it in my spinner rack from Harbor Freight, but the way the rolls were stacked on top of each other made them hard to look through, and I constantly had rolls falling out because it was just too full. I moved the inks that used to inhabit two IKEA Alex drawers to the spinner instead (where they're also much easier to find) and am now using those drawers as my new washi storage.
These small plastic containers were purchased at Target years ago and were sitting empty in our attic, and I was very happy to have yet another storage solution that didn't require any new purchases!
That's it for the moving, sorting, and storing projects this month! None of these took very long to complete, and they've all made it much easier to find my supplies (or in the case of the albums the right one I need to file a layout away). That's my favorite kind of organization- the kind that helps me actually locate and use my stash!
This month has been a quiet one for scrappy organization around here, but I have worked on a few little projects that have made some supplies and finished projects so much easier to find, use, and enjoy!
Finally, almost two years after ordering these binder spine labels from Amazon, I finally took the time to finish labeling all of my albums. I use American Crafts 12x12 D-Ring binders for my layouts, and these little black tabs fit perfectly (and snugly, so no falling off!) over the edges. I didn't use the paper tabs that came with the labels and printed my own out instead so I could use my favorite Traveling Typewriter font.
Most of my albums are labeled by year with a few special albums- vacations, holidays, etc.- thrown in the mix.
After falling in love with Heidi Swapp's new masks at Michaels, I found myself in need of a way to organize all of my stencils and templates to make them easy to look through. Previously I'd been just throwing them in a drawer in one of my IKEA Alex carts, but they were getting tangled up and torn (not to mention they were a pain to look through, meaning I rarely used them), so I went searching for another solution.
This post on Cocoa Daisy's blog turned out to be the perfect solution for me since I already had large binder rings, some old 12x12 post-bound page protectors, and 8.5x11 sleeves on hand. I did buy a package of We R Memory Keepers pages designed to hold four 6x6 layouts on a 12x12 page, though, since I had so many 6x6 templates.
I'm not quite sure what I want to do with the cover yet, so for now it's just a sheet of plain chipboard (also just laying around the scrap room) tucked inside another of the post-bound page protectors. I'm sure I'll deck it out sometime when I'm feeling inspired, but for now I'm just enjoying having all of my misting masks so easily accessible!
My washi tape also got moved to a new location. Previously I had it in my spinner rack from Harbor Freight, but the way the rolls were stacked on top of each other made them hard to look through, and I constantly had rolls falling out because it was just too full. I moved the inks that used to inhabit two IKEA Alex drawers to the spinner instead (where they're also much easier to find) and am now using those drawers as my new washi storage.
These small plastic containers were purchased at Target years ago and were sitting empty in our attic, and I was very happy to have yet another storage solution that didn't require any new purchases!
That's it for the moving, sorting, and storing projects this month! None of these took very long to complete, and they've all made it much easier to find my supplies (or in the case of the albums the right one I need to file a layout away). That's my favorite kind of organization- the kind that helps me actually locate and use my stash!