Scanning Magazines with a Fujitsu ScanSnap

Wednesday, March 10, 2010

I've been meaning to write a post for quite a while now on how magazine scanning works with my Fujitsu ScanSnap S510. I've been meaning to do so for so long, actually, that in the meantime Fujitsu has discontinued the S510 and replaced it with the S1500. It looks like it has the same specs as the S510, it just scans a little faster and is more expensive. I paid $350 for my scanner from NewEgg, which may seem like a lot until you realize that it comes with a full version of Adobe Acrobat. The S1500 is $420 right now on Amazon.


The coolest thing about the ScanSnap is its auto-feeding document tray. The specs say it takes up to 50 sheets, but for most issues of scrapping magazines you can fudge it and fit a 130 page (65 sheet) or so issue into it (probably because magazine pages are thinner than regular paper). The auto-feeding tray allows you to simply dump your magazine into the hopper, press the scan button, and let the scanner and your computer do the rest of the work. Sooooooo easy!

In order for the document feeder to be able to handle a magazine, the pages have to be separated. There are several methods for doing this, my favorite being using my Mom's mat cutter (she used to have her own custom framing business and still has all the equipment) to quickly slice the spines off. If you don't have access to a mat cutter, an X-Acto knife and metal ruler are a nice substitute.

I like to start out by carefully tearing the cover off. You can cut it with the rest of the pages, but inevitably you lose part of a letter or image along the side. By tearing you preserve the whole cover in all its graphically designed glory.


After removing the cover, line your ruler up about a quarter inch from the spine of the magazine and hold it securely while trimming against it (on the spine side) with your X-Acto knife. Since I'm right handed, I flipped the magazine upside down to keep the spine on the right hand side.


The alternative method to cutting out pages is to tear them out. Hold down the right side of the magazine while gently pulling out and down on the left hand page to remove it from the spine's adhesive strip. This method takes longer than cutting and is prone to leaving frayed edges, but I have used it several times and it does work.


The second coolest thing about the ScanSnap is that it scans both sides of the page at the same time. That means no flipping the stack over and re-scanning to get the other side, and no collating necessary. Here's what the scanner looks like in action (hooked up to my MacBook).


After scanning is completed, the software starts an OCR (Optical Character Recognition) process. This is probably the third coolest thing about the ScanSnap- it makes your magazines searchable!


When the entire process is finished, you're left with a PDF file of your magazine that you can call up on your computer at any time! Pretty cool, eh?


I originally bought the ScanSnap to help tame the paper beast that was our home business filing system, but I quickly realized how useful it was for cataloging all kinds of paper. I've used it to scan receipts, manuals, articles, and all manner of paperwork, and Darren has found it very useful for scanning medical texts to use in the field when he's on overseas mission trips. What seemed like a pricey purchase at first has turned into one of the best organizational decisions I ever made!

Scrap Room Part 5: Scraps and Miscellaneous

Monday, February 8, 2010

Hello, and welcome back to my scrap room tour! Today we're covering the final segment- paper scraps and some miscellaneous items. If you missed any of the other parts of the tour and would like to catch up, click here.

I keep my all my solid and some of my patterned paper scraps stored in this wicker laundry basket from Michaels. I bought it eons ago (on sale for 40% off) and actually used it for laundry for quite a long while, so it's a great example of repurposing containers you may already have around the house.


Scraps are stored by color group in 2.5 gallon zip-top bags by Hefty. I bought mine at Target, but I think that Wal-Mart also carries them.


Some patterned scraps are kept out of the basket, though. This binder is full of scraps that I've stored together because they are all from the same paper line. I used to keep them in their own bags in the basket, but after a while there were so many of them that it was hard to go through them all. This solution is much, much easier.


I had a ton of extra page protectors left over when I switched from post-bound to d-ring albums (because my new albums came with tons of new protectors), so I used the leftovers to sort my scraps. Having all the scraps from a line together makes it a lot easier to find coordinating patterns if I want to make another layout or card from them.


We've been through the major parts of my scrap room- paper, tools, and embellishments, but what about all those miscellaneous things that pile up? Things like glues, paints, and ink pads have to live somewhere! I have mine stored in a three-tiered spinning organizer that I picked up at Wal-Mart in the craft department. I think it was $24 and was originally meant to hold acrylic paint bottles. I'm not very happy with the fact that it just lives on the floor right now, but I'm just not sure what else to do with it.


My stickles live in it, along with some jars of glitter that for some reason don't live in the bling basket. Don't ask me why- they just ended up here! :)


I also store all my paints, brushes, and paint trays here.


I never realized just how many different kinds of glue I had until I arranged them all in this organizer!!


I also store ink pads and rubber stamps here. I'm not a big stamper, but I do have a few things. I mostly use stamp pads for inking and distressing paper. Oh, and the couple of bottles of Glimmer Mist that I own also live here.


Before I wrap up the tour, I'd like to introduce you to my printer's home. I'd like to keep it on my desk, but it's a HUGE wide format monster and would take up a ton of my desk space. Instead, it lives under the bed. No, I'm not joking!! It's on a rug so I can easily slide it out when I want to print and then slide it right back into storage. My laptop is the only computer in the house set up to run with it, so I just plop the computer down on the bed when I want to print and hook the bad boy up!


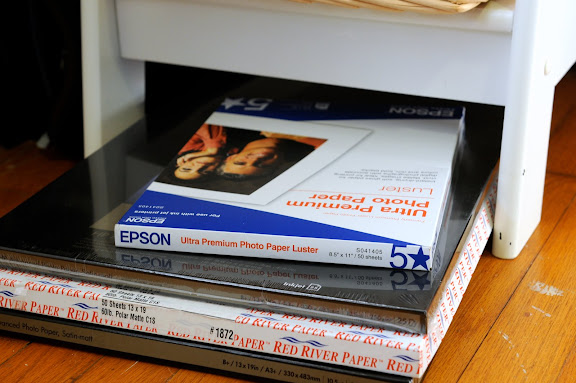
I don't think I got to this when I did the desk tour, but I keep all my print media underneath the bottom shelf on one side of my desk. If you're curious, the other side holds a binder full of Stargate, Babylon 5, Farscape, and Firefly DVDs. :)


And that, folks, is it for my scrap room tour! I hope you've enjoyed it, or at least don't feel the need to send out men in white jackets to pick me up. :)

Scrap Room Tour Part 4: Other Embellishments

Monday, February 1, 2010

It's time for Part 4 of my scrap room tour! Today's post will be a bit shorter than previous ones. If you've read all the others already, awesome and thank you! If not, you can find them (and some other entries on how I put the room together in the first place) here.

Thus far in the tour we've seen where I store my alphabets and my flat embellishments, but there's still the matter of all those more dimensional items (the ones that I find so difficult to use on pages, and yet I still seem to keep buying more). I keep those items, again sorted by color, in this stack of drawers that sits in the corner next to the bed.


I purchased the drawers at a couple of different places- Hobby Lobby and Wal-Mart. Both places carry the Sterilite brand, and they're specifically labeled saying that they accommodate 12x12 paper.


There is a drawer for each color- pink, red, orange, yellow, green, teal, blue, purple, black, white, and brown, plus a multicolor drawer on the bottom.


As I mentioned in a previous organizational post, several sets of alphas have made it into these drawers (see the gold glittered alphabet above). I really do need to find a better way to store these, but right now I'm kind of at a loss as to how. I've considered storing them by letter, but I think having the fonts all mixed up would drive me crazy- I'm kind of OCD like that. :)


Anyway, I just kind of threw anything and everything dimensional into these drawers- flowers, photo corners, book plates- you name it, there's probably one in here.


All the silver and grey stuff gets stored with black, gold is with yellow, and cream/off-white is with white.

The multicolor drawer mostly holds flower kits from an old Cafe Prima subscription. I could have split these into their own colors, but the kits coordinate so well that I decided to leave them together.


Tiny dimensional embellishments are stored in little bitty ziploc style bags from the jewelry section of the craft store. I put set of things like brads, charms, eyelets, and small alphas and words in bags, punch holes in the corners, and loop them onto binder rings. The rings themselves hang on the branches of this coffee mug tree from Bed, Bath, and Beyond.


Each ring is sorted by color (how else?), though each ring usually holds 2-3 colors. I've had my small embellishments this way for several years, and it's really worked well for me.


So there you go- another installment of my scrap room tour. :) Just one more to go!!

And I thought I was organized!

Thursday, January 28, 2010

Today I had meant to post my album for Shimelle's "This is Why I Scrapbook" contest, but it is soooo not even close to being done. As in, I've only done the cover and printed the pictures not close to being done. Urgh.

Since I don't feel like doing anything creative tonight (ever have one of those days?), I'll leave you instead with a photo of Nicole Balch's beautiful craft room. She's definitely got the Expedit-and-pretty-curtains combo going on- love that! Be sure to click through to her blog for more photos. It's awesome!


I'll be back some time tomorrow with Friday Favorites. And maybe this weekend I'll get that album done. If I feel like it...

Scrap Room Tour Part 3: Mini Albums, Kits, Seasonal, and Projects in Progress

Monday, January 25, 2010

Welcome back for the third installment of my big scrap room tour! If you missed the first two parts you can check them out here.

Today I'm going to walk you through my solution for storing mini album supplies, some seasonal items, and most importantly page kits and works in progress.

The bookshelf below houses all the items mentioned (plus a few more things) and sits on the wall between the bed and the Expedit. The curtain covering it is the same type of curtain I have on my window (clearanced shower curtains from Anthropologie). I sewed a rod pocket in it (plus I needed to take up a little extra length) and then put a tension rod through that. It works well to hide the mess, plus it can be easily pulled aside or even removed when needed.


I keep the bookshelf covered because it's not the neatest part of the room- all those boxes and a few little piles of things actually make it look pretty cluttered. There is definitely a method to the madness here, so let's take it shelf by shelf (just like the Expedit tour), shall we?


I keep these pretty photo sorters on the very top of the shelf. Mom and Dad bought them for me for Christmas many years ago. Michaels used to carry them, though I haven't seen them there in a long time.


I'm afraid that the next shelf down is not very organized at all. It's where I just kind of throw stuff that I don't know what else to do with. The only exception to that is my large Fiskars trimmer. It only lives up here because it's really big and doesn't fit anywhere else.


The next shelf down actually has some room for expansion, proving that my room is not completely stuffed to the gills. :) Here I've stored some page kits in big 2.5 gallon Hefty zip top bags. Normally these would be in 12x12 Iris boxes like the other page kits, but I kind of, ummm, ran out of them. (blush)


There are two 12x12 Iris boxes on this shelf. One holds scraps and items that need to be put away. Inevitably when I come home from a crop with a stack of completed pages, I also end up with a partial box full of paper scraps and leftovers from my page kits. They sit in this box until I get around to putting them away.


The other box holds supplies for my most current project. In this case, it's holding all the stuff for my Journal Your Christmas album.


The next shelf down holds more boxes of page kits and also past kits from kit clubs.


Kit club kits, like this one from Scarlet Lime, are stored several to a box, each in its own bag.


There are also kits that I've made myself from my stash, like these that were the result of the Color Creative class I took online last summer at GotCrafts.


And there are also boxes of single page kits that I've put together. I could (and probably will) do an entire post on how I put together page kits, but in a nutshell I start with a sketch and photos (which I have cropped and printed to size), then choose paper and embellishments to go along with them. Kits get stacked in 12x12 boxes with sheets of cardstock between them. They make it super easy to just pick up a box and go to a crop.


I didn't get a full picture of the next shelf down, but it's basically just more page kits with only a couple of new things thrown in.


There are boxes here for seasonal embellishments. I only use these on certain projects, and it's much easier if they are all in one place. Christmas items are here.


And Halloween ones here.


Also on this shelf are some bigger kits- these are for entire albums, like this one for a cruise that Darren and I took in 2004. Yes, I really am working on photos from that far back still! The entire album is coordinated, so I'll keep everything together here until it's finished. (Note to self: finish this album soon!)


This is another "album kit" for some of Darren's mission trip photos.


The very bottom shelf holds an assortment of miscellaneous albums, some collections of memorabilia waiting to be placed in a scrapbook, and also some empty organizers. It also contains boxes of mini album supplies and page protectors.

Mini album supplies, including some complete blank albums and supplies to make my own albums are stored in three different boxes. There's no rhyme or reason, it's just all kind of thrown together.


The page protectors in this box are divided and/or odd sized ones that I don't use very often. I bought most of these on clearance at Archivers a long time ago.


And that's the end of Part 3 of the scrap room tour! Judging by the number of photos I have left, there will be two more posts. Hopefully I will have them both up next week. :)

I'm linking this to Get Your Craft On day over at Today's Creative. Click the banner below to see what everyone else has been working on!


Scrap Room Tour Part 2: The Expedit

Monday, January 18, 2010

Welcome to the second part of my scrap room tour! If you missed the first part, you can find it (and a lot of other posts about the process of putting it together) here.

Let's take a stroll down the aisles of my Expedit today (and if you want to read about the nutty whirlwind trip that we took to get my Expedit, click here).

This shelf really is the best organizational piece I could have bought for my scrap room. It holds a ton of stuff in a minimal amount of space and is sturdy enough for the shelves to not warp under the weight of all that paper. It's also the perfect size for holding 12x12 papers and albums. I have yet to find another shelf that can do that. Did I mention that it was on sale when I bought it? Yup, got it for a mere $160!


Let's take this shelf by shelf, shall we?

The top shelf houses all of my albums and albums in progress. Let's face it, they're all albums in progress! I am definitely not a chronological scrapper. I just scrap what appeals to me at the time and file it away in the proper binder for the year it fits in.

I use mostly American Crafts 12x12 3-ring binders, but as you can see I have a few post bound (mostly theme/vacation albums) as well. The 3-ring binders make it very easy to insert and remove pages from my albums.


The next row of shelves houses all of my patterned paper. Before I procured the Expedit, I had some paper in Cropper Hopper vertical holders, some in 12x12 Sterilite drawers, and some just laying around. Gasp! Now it's all neatly stored in vertical holders and soooo much easier to go through and find what I need quickly.


I tend to mostly sort by manufacturer and then by lines within a manufacturer, like all my Basic Grey papers above or Sassafras below.


Stacks (such as these DCWV stacks) tend to get left together and outside of a container until I've pulled out too many pages and they start falling apart. Then they get transferred to vertical holders.


I keep my seasonal papers separate, regardless of manufacturer. For instance, my Basic Grey Halloween papers are over in this section instead of with Basic Grey.


Same goes for Christmas stuff.


I keep my cardstock separated by color (except for kraft, which I have so many packs of that I just stuck it in wherever it would fit) in more Cropper Hopper vertical paper holders. 12x12 and 8.5x11 are stored separately.


The next cubby over from the 8.5x11 cardstock contains yet another basket from Wal-Mart. I should have bought some of those pretty wicker ones from IKEA (they are taller and fit the Expedit perfectly), but since it's 4 hours away I can't exactly run back over and pick up a few.

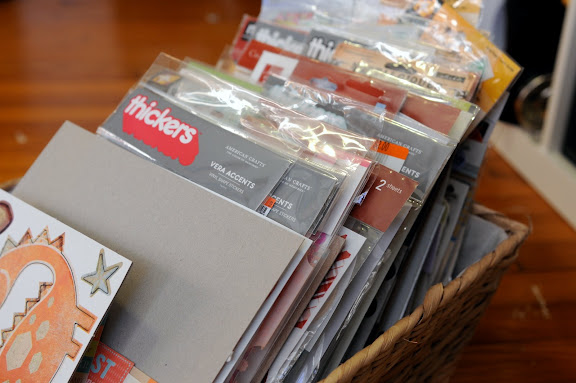
This basket houses my non-alpha flat embellishments such as stickers, border strips, and rub-on sheets. The section up front is for items that I have recently used and newer items that have yet to be put away. Any Thickers in this basket are the shaped ones and not alphabets


Items in the basket are arranged in color order with 8.5x11 chipboard dividers (from the backs of DCWV stacks) between each section.


I mostly leave items in their packages when I put them in here as it helps keep them from getting bent up and keeps stickers from being accidentally peeled off their backing sheets.


I will admit that I'm not very happy with the organization of the basket (from Target) in the next cubby over. It contains all my chipboard sets including some alphabets. I keep some alphabets stored by color in my embellishment drawers that I will share later, but I'm not very happy with that solution, either.

Each set is in a little plastic sandwich baggie to keep it from getting mixed in with the others.


The next row of shelves down mostly holds idea books and magazines, but I squeezed in a few of these CD baskets from Target. One holds my seasonal punches (because they won't fit in the punch basket in my desk).


There's no rhyme or reason to how they're stored in here- Halloween and Christmas and other seasons (I have a shamrock punch in there somewhere) are all jumbled together.


The other three baskets hold my ribbon collection, also sorted by color. Are you catching the theme, here? I totally scrap by color, so that's how most of my items are stored.


All this ribbon used to be on spools, but during a particularly long TDY (6 months in Colorado, much of which was in the winter) I would sit in my apartment with my cat and a good DVD on and wind my ribbon around these cards instead (it didn't take nearly as long as that makes it sound). It is so much easier to find now and takes up a lot less space!


I will admit that I am a complete and total idea book and magazine junkie. They take up nearly the entire fourth row of my Expedit, and these aren't all of them!! Where are the rest, you ask? They are on my MacBook! I need to write a whole separate blog post about it some time, but in a nutshell I have this fabulous sheet-feeding scanner that scans both side of a page at once. I've cut the spines off of most of my magazines and dropped them into the hopper to be imaged. It creates a nice, neat, searchable PDF out of each of them that takes up infinitely less space (and makes it more usable).


But there are some books and magazines that I just can't bear to cut apart, like my massive stack of Scrabook Trends issues. In the last year I've switched over to a digital subscription with them and love it, so I don't have to worry about any more buildup here.


Same with my issues of Cards- I receive them digitally now, as well. The other books in here are among my favorites (many were gifts) and I am leaving them intact rather than scanning them in.


We've made it to the final row of my Expedit. Are you getting tired yet? Whew!

This first cubby holds some of my larger tools. My Xyron, Making Memories trimmer (this is not my everyday trimmer, but is great for trimming photos from the printer), glass mats, and a circle cutter are among the items in here.


The next three cubbies hold both my older scrapbooks and scrapbooks for items such as birthday and Christmas cards that I want to keep. I tend to just stick these items on white cardstock with photo corners, but I still love flipping through them from time to time.

The third cubby for this section is actually empty, but that's because some of my empty binders for this project are still in storage.


Finally, this last section holds albums that are empty, just waiting to be filled. I've picked these up mostly at Hobby Lobby when they are 50% off. Now that I have a few extras, I can avoid those sales for a while. :)


So, do you think I'm totally nuts yet? I think I've made it look like I have a lot more than I really do. I was just having so much fun taking pictures while I was cleaning that I got a little carried away.

Stay tuned for the next installment, where I'll show you where I keep page kits, mini album supplies, and projects that are in progress.

CopyRight © | Theme Designed By Hello Manhattan