
For example, I've been wanting to make an album about my family's cruise to the Bahamas for quite a while now (basically since we got back last year). My photoholic self took nearly 1600 pics in a 6 day period (that's a lot of layouts), and I knew that I wanted to put them in their own album with a common look and feel running through all of the pages. So let's take a look at the steps that I took to prepare for that, shall we?
Step 1 was to go through my photos...all of them...and choose the ones I wanted to scrap. All of them. At the same time (because batching tasks is more efficient for the way I work and think). Even that step I took in smaller increments, choosing groups of photos that I knew would go on a layout and then editing, cropping, and resizing those photos in small batches. For more on how I prep photos to be printed for a layout, check out this post. If you want to know how I organize my planned pages so I know what sketch goes with what photos, read this post.

I decided at the outset that I would use only sketches by Allison Davis (she has some awesome, wonderful sketch books), and I stuck to that for all but about three pages of the album (those three layouts are single page, and all of Allison's sketches are doubles). That kept a common feel to the design of all the layouts, plus Allison has some awesome layouts for putting lots of photos on a page. Really, I can't say enough good things about her sketch books.
The photo above is my stack of prints after I had chosen, edited, cropped, printed, and then trimmed for all my planned pages. I should have taken a picture of the stack before I cut them apart, but I totally forgot!!

Speaking of cutting them apart, that was step two of my album planning process. Several of my prints were 4x6 and required no cropping, but the odd sized prints (and I knew which ones to print at odd sizes because I'd picked out my sketch ahead of time- yay!!) needed to be cut apart and trimmed to size. I did all of that cutting in one batch, as well (it took about 45 minutes).
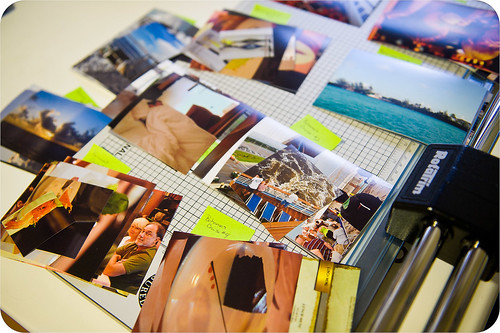
Step 3 was the sorting process (total time spent was again about 45 minutes) where I went through all of those prints that were now cut down to size and, referring back to my planned pages stored on my Macbook (again, more info on that here), sorted them into piles according to their respective layouts (along with a post-it note to tag the layout number for each set).

I had a lot of piles when I was finished- this album will have something like 25 layouts in it, most of them 2-page.

Did you notice that I said "will have"? I haven't actually scrapped all of these pages yet- this is just the planning stage!! To make sure that everything is ready and easily accessible when I am ready to scrap, I decided to go ahead and fill my album with empty page protectors (I'm using a Making Memories travel themed album that I bought at Tuesday Morning). I placed the photos for one layout in each page protector, so all I have to do when I want to scrap a page is grab a batch of photos, reference the coordinating sketch on my computer, pull out my album kit, and go to work!
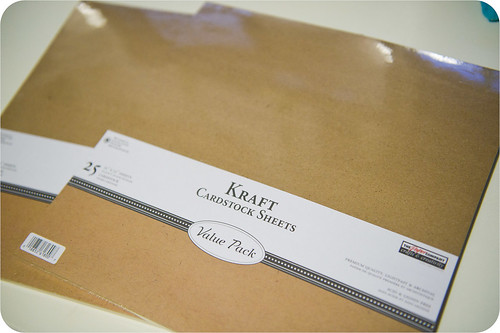
Ooops, did I say album kit? Maybe I'd better explain that, too. Since I want all of these pages to have a common look, it makes sense that I would use some common elements on each page. I decided early on that the background cardstock would be kraft for all pages, mostly because it's my favorite neutral, and partly because I actually had enough of it in the stash already and wouldn't have to buy anything new (I actually shopped my stash for the entire album kit!).

Then it was on to the fun part- patterned paper selections!! The Marrakech collection from Basic Grey has the perfect mix of bright colors and fun prints, so it immediately went into the kit.

I also chose the Tahiti Beach

While I was browsing through my paper I came across the Saffron stack, also by Die Cuts with a View. I'm not so sure that the greens and purples will work well with my album, but I know that some of those yellows will find their way in. I decided to go ahead and pull one sheet of each pattern, anyway- it's super easy just to put it back if I don't use it all.

I also had quite a few bits and pieces left of a Scarlet Lime kit from last June that I pulled out to use. It's actually the same kit that I used when I scrapped a mini album about the same cruise last year.
I didn't pull out any embellishments or alphabets beyond what was already included in the Scarlet Lime kit. This is going to be a long-term project, and I knew that if I pulled out any of those items for the album kit I might overlook an opportunity to use them on other page. Plus, most of my travel/beach themed embellishments are already in a box of their own in my embellishment storage system, so they're easy enough to get to when I need them.
So, now my cruise album is all printed and prepped to be scrapped as I have time. By batching the editing and printing tasks, choosing a common set of sketches to work from, and making an album kit, I've done a lot of work ahead of time for myself and can sit down and just enjoy making pages.
Hopefully some of this information will help you as you plan your scrapping projects both large and small. :)