
One of the best things (besides having my scrapbook room together) about finally having finished moving and sold our other house is that I have the time to do a bit of decorating for all the fun little holidays that happen throughout the year. I mean, sure, I used to always decorate for Christmas, but I just never seemed to find the time to do something special for days like Thanksgiving or Easter.
Or St. Patrick's Day- probably my favorite besides Christmas since it's also my birthday. :)
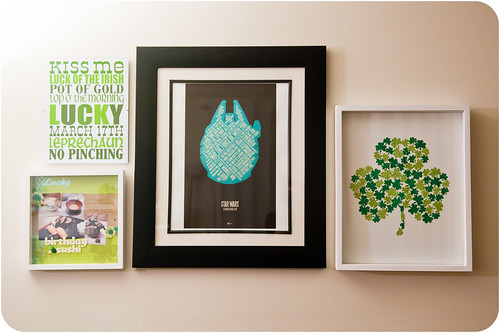
The photo above shows my little collage of frames that I'm constantly swapping pieces in and out of for different seasons and holidays. For St. Patrick's Day I've printed up a piece of subway art (found here) for the 11x14 clip frame, placed a layout about last year's birthday dinner in the 12x12 frame, and for the 16x20 shadow box I cooked up a special piece of shamrock wall art using a bunch of stickers from the JoAnn dollar bin.
Want to see how I made it? Glad you asked!!
I needed a template, so I started by doing a Google image search for a shamrock. Luckily the first image that popped up was perfect, so I ran with it.

Since I only needed the image to use as an outline, I didn't care about the coloring or size- only that it had a well defined shape to it.
I then opened the image in Photoshop Elements, where I also created an empty 16x20 canvas. After placing a copy of the shamrock image on the canvas, I resized it until it filled the desired portion of the canvas. This helped me see, proportionally anyway, how the shamrock would fill a 16x20 area. Again, since I only cared about the outline of the shamrock I didn't care how much the image pixellated as I enlarged it by a few hundred percent.

Once the shamrock was the desired size I needed a way to print it on 8.5x11 paper (the largest I have for our printer). Since the image was nearly 12"x12" at this point I had to use the selection tool to highlight portions of it, copy them, and paste them into new, smaller images that would fit on my printer paper. I ended up with four different sections, making sure that pieces of each section overlapped with the sections next to it.

Then I printed them and cut them out...

...and using the overlapping parts as guides I taped it all back together again. (Apologies for the wonky angle of the picture- I was on massive amounts of Sudafed at the time and wasn't exactly thinking clearly.)
After taping my shamrock template (yes, I went to all of that trouble just for a template) together, I placed it on a 16x20 board (mine is a white Canson artist's drawing board from Hobby Lobby) and traced around it lightly with a pencil.

I could have tried to freehand a shamrock and not gone to all the trouble of making a template, but I really, really can't draw!
After tracing the outline, I began filling it in with these fun shamrock stickers. As I mentioned earlier, I purchased them for a dollar a pack at JoAnn, and I think I used 3-4 packs to make this piece. The packages say that they're paper stickers, but when I peeled the backing off of one I found that it's actually made from a thin canvas. They were super easy to work with and would peel up nicely if I needed to reposition one, but otherwise they stayed firmly stuck.

I found it a lot easier to fill in if I started by going around the outline of the shamrock and then filled in the open areas afterward. I did a lot of playing with orientations and sizes to get the stickers to fit so closely together. It was kind of like working on a jigsaw puzzle (which is cool because I really like puzzles).

After a little over an hour of fitting stickers together (and cutting stickers to fit into the stem), my board was finally finished! I also erased the pencil outline (my kneaded eraser was great for getting into areas that were perilously close to a sticker) to hide any evidence that I needed such a crutch. :)

I'm totally in love with this little grouping now that it's all together! And, yes, the Star Wars poster is a permanent resident. Star Wars works with any season. :)
I also sprinkled a few green things on the mantle. One of my favorite (quick, easy, cheap) holiday decorations involves taking an inexpensive garland and shoving it into an apothecary jar. I did the same thing with a bat garland at Halloween and some pretty beads at Christmas, and this time around I had a shamrock garland that worked nicely next to a couple of Beanie Babies.

I've never quite known where to stick these shamrock lights, so for now they're coiled up in a glass pitcher. I think it's kinda cute. :)

So, even if I don't get to spend the next week at home (I'm going back to Boston next week), I'll still get to come home to a decorated house. Love that!