
Today's layout was something of an experiment in using papers with large pre-printed background elements. These are papers that almost every scrapper has in their stash, and based on recurring message board threads that pop up now and then (along with my own experience) they can be a bit challenging to use!
The paper below came in my September kit from Studio Calico and is part of Basic Grey's Clippings collection. Normally my first instinct with a paper like this is to either cut out just an element or two and use them as embellishments or to skip the pre-printed side altogether and just use the B side (this paper happens to have a fantastic small pattern on the back), but this print is quite close to my own style with all those paper layers, so I decided to see what I could do with it as-is.

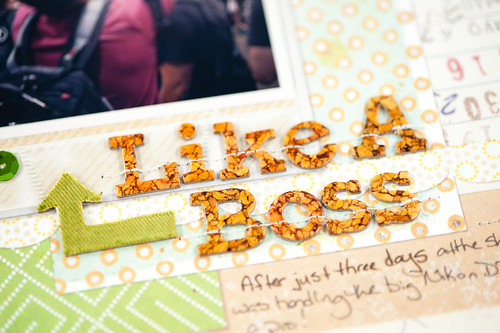
This is the layout that I came up with, and like yesterday I used an Instagram photo from Star Wars Celebration VI. There was a little issue with the prints I ordered from Shutterfly as a trial (I normally use Snapfish), and the sides of all but my square photos were cut off! I've since reordered the photos from good old reliable Snapfish and am anxiously awaiting their arrival. The 4" square print was a perfect fit for the Polaroid-style background on the page.

I love this photo of my brother wielding my Nikon like a pro. He really took to the camera while we were at the convention and would often take it away from me to shoot on his own, and Mom says that he talks about photography a lot now and wants his own DSLR. J, I recommend the Nikon D3200! :)

You'd think that with so many elements already on the page that this layout would have come together more quickly than usual for me. But ooooooooh, no! This page took just as long or longer than the layouts that I normally put together from scratch. I kept wanting to add more layers in, but the Polaroid frame around the photo made it difficult since any paper layers had to go under it and not just under the photo. I did use a craft knife to cut a slit on the left-hand side of the Polaroid border to layer in a die cut, but in the end all I could really do without deconstructing the entire background was add a title and a few dimensional embellishments.
It was also next to impossible to use dimensional adhesive under my photo or the paper layers on this page, which left everything looking a bit flat. The paper does have drop-shadows printed on it that lend some artificial depth, but for me there's nothing like adding some real dimension to a page and hand-curling the edges of my paper layers.

This page was a fun experiment, but I think in the future I'll stick to fussy cutting elements or using the B-sides of papers like this. It's always a good idea to try papers like these for yourself, though- you might find that they work quite well for you. Every scrapper is different!
Supplies (click on images for product links):